Mastering Load Balancing for Optimal WordPress Performance: A Comprehensive Guide

Mastering Load Balancing for Optimal WordPress Performance: A Comprehensive Guide

Enhance your WordPress site with our comprehensive guide on load balancing. Discover how to improve performance, ensure high availability, and scale seamlessly. This article covers the workings, benefits, and implementation steps of load balancing, packed with technical details and practical tips for tech-savvy professionals.

What is Load Balancing?

In the fast-paced world of web hosting and cloud optimization, load balancing stands out as a critical technique for maintaining applications’ availability, reliability, and performance. But what exactly is load balancing? At its core, load balancing distributes incoming network traffic across multiple servers to prevent any single server from becoming overwhelmed. This ensures the smooth functioning of websites, applications, and databases. For WordPress sites, load balancing can significantly improve user experience by reducing load times and minimizing downtime.

Also Read | Understanding Web Application Firewall (WAF)

How Does A Load Balancer Work?

A load balancer manages traffic distribution across multiple servers. Here’s an in-depth look at how it operates:

  1. Traffic Distribution: When a user sends a request to a website, the load balancer intercepts the request and directs it to one of several backend servers. The selection can be based on various algorithms, such as:

    • Round-Robin: This method cycles through the list of servers sequentially. For example, if there are three servers (A, B, C), the first request goes to A, the second to B, the third to C, and the fourth back to A.
    • Least Connections: This method directs traffic to the server with the fewest active connections, ensuring a balanced load.
    • IP Hash: This method uses the client’s IP address to determine which server receives the request, ensuring that the same client consistently connects to the same server.
    • Weighted Round-Robin: This method assigns weights to each server based on their capacity. Servers with higher weights receive more requests.
  2. Health Checks: Load balancers constantly monitor the health of backend servers through health checks. These can be simple ping checks or more complex HTTP requests to specific URLs. If a server fails a health check, the load balancer stops sending traffic to it until it passes again.

    bash:
    # Example health check command
    curl -f http://server1.example.com/health || echo "Server 1 is down"
    
  3. Session Persistence: Some applications require a user’s session to be maintained on the same server. Load balancers can use session persistence, or sticky sessions, to achieve this by using cookies or IP hashing to ensure subsequent requests from the same client go to the same server.

  4. SSL Termination: Load balancers can offload SSL decryption/encryption tasks, reducing the burden on backend servers and enhancing performance. This process involves terminating SSL connections at the load balancer and sending unencrypted traffic to backend servers.

    nginx:
    # Example SSL termination configuration in NGINX
    server {
        listen 443 ssl;
        server_name example.com;
        ssl_certificate /etc/ssl/certs/example.com.crt;
        ssl_certificate_key /etc/ssl/private/example.com.key;
    
        location / {
            proxy_pass http://backend_servers;
        }
    }
    
  5. Scalability: Load balancers facilitate scaling by adding or removing servers without downtime, adapting to traffic changes seamlessly. This can be automated using scripts or cloud provider features.

    bash:
    # Example script to add a new server to a load balancer
    aws elb register-instances-with-load-balancer --load-balancer-name my-load-balancer --instances i-12345678
    

Also Read | What is SSL/TLS Certificate?

Why Would You Need Load Balancing?

Load balancing becomes essential for several reasons:

  • High Availability: By distributing traffic across multiple servers, load balancers ensure that your site remains accessible even if one or more servers go down. This redundancy is crucial for mission-critical applications.
  • Performance Optimization: Load balancers help manage traffic efficiently, reduce server load, and enhance response times. By distributing requests based on server capacity and health, they ensure optimal performance.
  • Fault Tolerance: Load balancers provide redundancy by detecting server failures and rerouting traffic to functioning servers. This ensures continuous operation even during server outages.
  • Scalability: As your website grows, load balancers make it easier to scale horizontally by adding more servers to the pool. This allows you to handle increased traffic without significant downtime.
  • Security: Load balancers can help mitigate DDoS attacks by distributing malicious traffic and preventing any single server from being overwhelmed. They can also offload SSL processing, improving security and performance.

Also Read | What is SSH?: Secure Server Access for Advanced Network Management

Benefits of Load Balancing

Implementing load balancing brings a multitude of benefits:

  1. Improved Performance: Distributes traffic efficiently, leading to faster response times and better user experience. By ensuring that no single server gets overwhelmed, load balancers maintain optimal performance levels.
  2. Reduced Downtime: Ensures high availability by rerouting traffic in case of server failures. This redundancy is crucial for maintaining uptime and reliability.
  3. Scalability: Allows seamless addition or removal of servers based on traffic demands. This flexibility enables you to scale your infrastructure as needed.
  4. Enhanced Security: Protects against DDoS attacks and offloads SSL processing. By distributing traffic and handling SSL termination, load balancers enhance both security and performance.
  5. Resource Optimization: Balances load across servers, ensuring optimal resource utilization and cost-efficiency. This leads to better performance and reduced operational costs.

Also Read | Intrusion Detection System (IDS): A Comprehensive Guide

Setting up Load Balancing in a WordPress Site

Implementing load balancing for a WordPress site involves several steps:

  1. Choose a Load Balancer: Options include hardware-based, software-based, and cloud-based load balancers. Cloud-based solutions like AWS Elastic Load Balancing or Azure Load Balancer are popular for their scalability and ease of use.

    bash:
    # Example of creating a load balancer in AWS
    aws elb create-load-balancer --load-balancer-name my-wordpress-elb --listeners "Protocol=HTTP,LoadBalancerPort=80,InstanceProtocol=HTTP,InstancePort=80" --availability-zones us-east-1a us-east-1b
    
  2. Configure DNS: Point your domain’s DNS to the load balancer’s IP address to direct traffic through the load balancer.

    bash:
    # Example DNS configuration using AWS Route 53
    aws route53 change-resource-record-sets --hosted-zone-id Z3M3LMPEXAMPLE --change-batch '{"Changes":[{"Action":"UPSERT","ResourceRecordSet":{"Name":"example.com","Type":"A","AliasTarget":{"HostedZoneId":"Z35SXDOTRQ7X7K","DNSName":"my-wordpress-elb-1234567890.us-east-1.elb.amazonaws.com","EvaluateTargetHealth":false}}}]}'
    
  3. Install and Configure WordPress: Ensure your WordPress installation is set up identically on all backend servers. This includes installing the same plugins, themes, and configurations.

    bash:
    # Example WordPress installation script
    wget https://wordpress.org/latest.tar.gz
    tar -xzf latest.tar.gz
    mv wordpress/* /var/www/html/
    
  4. Database Configuration: Use a centralized database or a database cluster to ensure data consistency across servers. Services like Amazon RDS or Google Cloud SQL can simplify this process.

    bash:
    # Example configuration for connecting to a centralized database
    define('DB_NAME', 'wordpress');
    define('DB_USER', 'dbuser');
    define('DB_PASSWORD', 'dbpassword');
    define('DB_HOST', 'db.example.com');
    
  5. File Synchronization: Implement file synchronization solutions (e.g., rsync or shared storage) to keep your WordPress files consistent across all servers.

    bash:
    # Example rsync command for file synchronization
    rsync -avz /var/www/html/ server2:/var/www/html/
    
  6. SSL Certificates: Configure SSL termination on the load balancer to manage encryption and decryption. This offloads SSL processing from backend servers, improving performance.

    bash:
    # Example SSL termination configuration in HAProxy
    frontend https-in
        bind *:443 ssl crt /etc/haproxy/certs/example.com.pem
        default_backend servers
  7. Health Checks: Set up health checks to monitor server health and ensure traffic is only sent to healthy servers.

    haproxy:
    # Example health check configuration in HAProxy
    backend servers
        server server1 192.168.1.1:80 check
        server server2 192.168.1.2:80 check
    

Also Read | Understanding Content Delivery Networks

When Should You Implement Load Balancing?

You should consider implementing load balancing under the following circumstances:

  • High Traffic Volumes: When your website experiences high and fluctuating traffic, load balancing can ensure smooth performance. It’s especially useful during traffic spikes or seasonal surges.
  • Mission-Critical Applications: For applications where downtime is not an option, load balancing guarantees high availability. This is crucial for e-commerce sites, financial services, and other critical applications.
  • Geographically Dispersed Users: To provide a consistent experience to users worldwide, load balancing can distribute traffic across servers in different locations. This reduces latency and improves performance.
  • Scalability Requirements: When you anticipate growth and need a scalable solution, load balancing offers the flexibility to add servers as needed. This ensures that your infrastructure can handle increased traffic without significant downtime.

Challenges While Implementing Load Balancing

Despite its benefits, implementing load balancing comes with challenges:

  1. Complex Configuration: Setting up and configuring load balancers can be complex and requires a deep understanding of network architecture. Ensuring all components work together seamlessly can be challenging.

    yaml:
    # Example complex load balancer configuration in HAProxy
    global
        log /dev/log local0
        log /dev/log local1 notice
        chroot /var/lib/haproxy
        stats socket /run/haproxy/admin.sock mode 660 level admin
        stats timeout 30s
        user haproxy
        group haproxy
        daemon
    
    defaults
        log global
        mode http
        option httplog
        option dontlognull
        timeout connect 5000
        timeout client  50000
        timeout server  50000
    
    frontend http-in
        bind *:80
        default_backend servers
    
    backend servers
        balance roundrobin
        server server1 192.168.1.1:80 check
        server server2 192.168.1.2:80 check
    
  2. Cost: Hardware and cloud-based load balancers can be expensive, especially for small businesses. The cost of setting up and maintaining load balancers should be considered.

  3. Maintenance: Regular maintenance and monitoring are required to ensure load balancers function optimally. This includes updating configurations, applying security patches, and monitoring performance.

  4. Compatibility Issues: Ensuring compatibility between load balancers and existing infrastructure can be challenging. This includes compatibility with different operating systems, server configurations, and network setups.

  5. Latency: Introducing a load balancer adds layer, potentially increasing latency if not properly managed. Proper configuration and optimization are essential to minimize latency.

Also Read | What is Zero Trust Security?

Conclusion

Load balancing is a vital component of modern web hosting and cloud optimization. It enhances performance, ensures high availability, and provides scalability, making it indispensable for WordPress sites and other applications. By understanding how load balancers work, their benefits, and the challenges involved, you can make informed decisions to optimize your web infrastructure effectively. Implementing load balancing may require initial effort and investment, but the long-term advantages far outweigh the challenges, ensuring a robust and resilient online presence.

Recent Post

Mastering Load Balancing for Optimal WordPress Performance: A Comprehensive Guide

Mastering Load Balancing for Optimal WordPress…

Enhance your WordPress site's performance and reliability…

Understanding Web Application Firewall (WAF)

Understanding Web Application Firewall (WAF)

Explore Web Application Firewalls (WAFs): how they…

WordPress for E-commerce: Your Ultimate Guide

WordPress for Ecommerce

WordPress for E-commerce: Your Ultimate Guide

Discover how to build and optimize your WordPress e-commerce site with detailed steps, expert tips, and advanced strategies for enhancing customer experience and marketing.

In the digital age, e-commerce has become a crucial aspect of business strategy. Among the various platforms available for building online stores, WordPress stands out due to its flexibility, extensive customization options, and user-friendly interface. This blog delves into why WordPress is an ideal choice for e-commerce, offering technical insights for those with a sound understanding of the platform. Whether you are a seasoned developer or a business owner looking to optimize your online presence, this comprehensive guide will equip you with the knowledge needed to leverage WordPress for e-commerce effectively.

Why Choose WordPress for E-commerce?

Flexibility and Customization in WordPress

WordPress offers unparalleled flexibility, allowing you to tailor your e-commerce site to meet specific business needs. With thousands of themes and plugins available, you can customize your store’s appearance and functionality without extensive coding knowledge. For those with technical expertise, WordPress provides the freedom to modify the core code, ensuring complete control over every aspect of your site.

User-Friendly Interface

One of WordPress’s most significant advantages is its intuitive interface. Even users with minimal technical skills can navigate the dashboard, add products, manage orders, and update content with ease. This user-friendly experience reduces the learning curve, enabling you to focus on growing your business rather than grappling with complicated backend systems.

SEO-Friendly Structure

Search engine optimization (SEO) is vital for e-commerce success. WordPress excels in this area, offering clean code and SEO-friendly structures. Plugins like Yoast SEO further enhance your ability to optimize content, manage meta tags, and improve site performance, ensuring higher rankings on search engines.

Also Read | What is WordPress REST API?

Steps to Build Your WordPress E-commerce Site

Step 1: Find a Domain Name

Your domain name serves as your store’s online address. Choose a domain name that is memorable, relevant to your business, and easy to spell. Use domain registration services like GoDaddy, Namecheap, or Bluehost to search for and register your domain. Consider using keywords related to your business to improve search engine visibility.

Step 2: Choose Your Host Server

When building a successful WordPress e-commerce site, selecting a reliable hosting provider is crucial. Cloudphant stands out as an exceptional choice for several reasons. As a premium cloud optimization company specializing in WordPress hosting, Cloudphant ensures your site runs smoothly with optimized performance, enhanced security, and scalable resources.

Cloudphant offers a unique blend of self-hosting flexibility with the convenience of managed hosting. This means you get full control over your server while benefiting from Cloudphant’s robust management services. Their platform features automatic updates, security enhancements, and easy scalability through an intuitive dashboard, allowing you to adjust server resources on demand.

One of the key advantages of Cloudphant is its focus on performance optimization. They employ best practices to reduce load times and improve time-to-first-byte, ensuring your e-commerce site operates at peak efficiency. Additionally, Cloudphant provides extensive security measures, including OWASP guidelines, customizable WAF, and regular security updates to keep your site safe from threats.

Furthermore, Cloudphant guarantees 99.9% uptime with failover and healing mechanisms to prevent downtime. They also offer a 30-day money-back guarantee, giving you peace of mind and confidence in their services. With Cloudphant, you can launch, optimize, secure, and scale your WordPress e-commerce site effortlessly, making it a superior choice for your hosting needs​.

Book your appointment with our WP Engineer now. 

Step 3: Install WordPress on Your Host Server

Once you’ve chosen a hosting provider, installing WordPress is straightforward. Most hosts offer one-click installation, simplifying the process. Ensure that your installation is secure by following best practices, such as changing the default username and using a strong password.

bash

# Secure WordPress installation using WP-CLI

wp core download

wp config create --dbname=yourdbname --dbuser=yourdbuser --dbpass=yourdbpass --dbhost=localhost

wp core install --url="http://yourdomain.com" --title="Your Site Title" --admin_user="admin" --admin_password="strongpassword" --admin_email="[email protected]"


Step 4: Select an E-Commerce Plugin

To transform your WordPress site into a fully functional online store, you’ll need an e-commerce plugin. WooCommerce is the most popular choice, offering extensive features and integration options. To install WooCommerce:

  1. Navigate to Plugins > Add New.
  2. Search for “WooCommerce.”
  3. Click “Install Now” and then “Activate.”

Step 5: Set Up WooCommerce

After activating WooCommerce, you will go through a setup wizard to configure your store. This includes setting up payment gateways, shipping options, and tax rates. WooCommerce supports a variety of payment methods, including PayPal, Stripe, and direct bank transfers.

features of Woocommerce

PHP

// Example code to add a custom payment gateway in WooCommerce

function add_custom_gateway_class($gateways) {

    $gateways[] = 'WC_Gateway_Custom';

    return $gateways;

}

add_filter('woocommerce_payment_gateways', 'add_custom_gateway_class');


Step 6: Add Products or Services for Sale

With your store setup complete, you can start adding products. WooCommerce provides a user-friendly interface for managing products, including options for product categories, tags, attributes, and variations.

  1. Navigate to Products > Add New.
  2. Enter the product name, description, and price.
  3. Upload high-quality images.
  4. Configure inventory settings, shipping options, and linked products.

Step 7: Choose Your WordPress Theme

Choose a responsive and e-commerce-friendly theme to enhance your store’s appearance and functionality. Themes like Astra, OceanWP, and Storefront offer seamless integration with WooCommerce and come with pre-designed templates that you can customize to fit your brand.

Step 8: Add Useful Plugins and Extensions

To maximize your store’s potential, consider adding plugins that enhance functionality. Here are some must-have plugins for e-commerce:

  • Yoast SEO: Optimize your content for search engines.
  • WP Super Cache: Improve site speed and performance.
  • MailChimp for WooCommerce: Manage email marketing campaigns.
  • WooCommerce Subscriptions: Offer subscription-based products.

Step 9: Configure Essential Settings

Site Speed Optimization

Site speed is critical for user experience and SEO. Implement the following strategies to boost your site’s performance:

  • Use a Content Delivery Network (CDN) to distribute content globally.
  • Optimize images using plugins like Smush or EWWW Image Optimizer.
  • Enable caching with plugins such as W3 Total Cache or WP Rocket.

Security Measures

Protecting your e-commerce site from threats is paramount. Implement security measures such as:

  • Regularly updating WordPress, themes, and plugins.
  • Using security plugins like Wordfence or Sucuri.
  • Implementing SSL certificates to encrypt data.

Step 10: Enhance User Experience

A positive user experience drives sales and customer loyalty. Focus on the following areas to enhance usability:

  • Navigation: Simplify site navigation with clear menus and search functionality.
  • Mobile Optimization: Ensure your site is mobile-friendly, as a significant portion of traffic comes from mobile devices.
  • Checkout Process: Streamline the checkout process to reduce cart abandonment.

Also Read | How to deploy a WordPress website on AWS?

Advanced E-commerce Strategies

Implementing Analytics

Tracking and analyzing data is essential for informed decision-making. Integrate Google Analytics with your WooCommerce store to monitor traffic, conversions, and customer behavior. Use this data to optimize marketing strategies and improve user experience.

PHP

// Adding Google Analytics tracking code to your theme's header

function add_google_analytics() {

    ?>

    <script async src="https://www.googletagmanager.com/gtag/js?id=UA-XXXXXXX-X"></script>

    <script>

        window.dataLayer = window.dataLayer || [];

        function gtag(){dataLayer.push(arguments);}

        gtag('js', new Date());

        gtag('config', 'UA-XXXXXXX-X');

    </script>

    <?php

}

add_action('wp_head', 'add_google_analytics');


Leveraging Social Media Integration

Social media platforms are powerful tools for driving traffic and sales. Integrate social media with your WooCommerce store to reach a broader audience. Use plugins to add social sharing buttons, display Instagram feeds, and enable Facebook Shop integration.

Utilizing Email Marketing

Email marketing remains one of the most effective ways to engage with customers. Build an email list and use automated email campaigns to promote products, offer discounts, and send personalized recommendations. MailChimp for WooCommerce makes this process seamless, allowing you to manage campaigns directly from your WordPress dashboard.

Offering Multi-language Support

To cater to a global audience, consider adding multi-language support to your store. Plugins like WPML (WordPress Multilingual Plugin) or Polylang enable you to create a multilingual site, enhancing accessibility and expanding your reach.

Enhancing Customer Experience

Creating a positive customer experience is essential for retaining customers and encouraging repeat business. Here are several ways to enhance the experience for visitors to your e-commerce store:

User Registration and Accounts

  • User Registration: Allow customers to create accounts to streamline future purchases. An account system can store shipping addresses, payment information, and order history, making the checkout process faster and more convenient.
  • User Roles and Permissions: Use WordPress’s built-in user role system to manage permissions. This ensures customers have access to their purchase history and account settings without compromising site security.

Customer Reviews and Ratings

  • Encouraging Reviews: Product reviews build trust and provide valuable feedback. Implement systems that encourage customers to leave reviews after purchase, such as follow-up emails or incentives.
  • Managing Reviews: Use plugins like WooCommerce Product Reviews Pro to manage and display reviews effectively. Highlight positive reviews and address negative ones promptly to maintain credibility.

Customer Support

  • Live Chat Integration: Integrate live chat tools like Tidio or LiveChat to offer instant support to your customers. Real-time assistance can resolve issues quickly and improve customer satisfaction.
  • Help Desk Systems: Implement help desk systems like Zendesk or Freshdesk to manage customer queries efficiently. These platforms can organize tickets, track response times, and ensure no customer inquiry goes unanswered.

Personalized Shopping Experience

  • Product Recommendations: Use AI-driven plugins like Recomendo or Beeketing to offer personalized product recommendations based on browsing history and past purchases.
  • Wish Lists: Allow customers to create wish lists for products they are interested in. This feature not only enhances user experience but also provides valuable data for targeted marketing.

Easy Navigation and Search

  • Intuitive Menus: Design intuitive navigation menus that categorize products logically. Use mega menus for larger stores to provide a comprehensive view of available categories.
  • Search Functionality: Enhance your site’s search functionality with plugins like SearchWP or Relevanssi. These tools can improve search accuracy and speed, helping customers find products quickly.

Also Read | A Guide to WordPress Security

Conclusion

WordPress offers a robust and versatile platform for building and managing a successful e-commerce store. Its flexibility, extensive customization options, and user-friendly interface make it an ideal choice for businesses of all sizes. By leveraging the power of WooCommerce and other essential plugins, you can create a feature-rich online store that not only meets your business needs but also provides an exceptional shopping experience for your customers. Stay proactive with site maintenance, security, and optimization to ensure your e-commerce store thrives in a competitive digital marketplace.

Implement these strategies and tools to harness the full potential of WordPress for e-commerce, and watch your online business flourish. Whether you’re starting from scratch or looking to enhance an existing store, this guide provides the foundation and advanced techniques needed to succeed in the world of online retail.

Recent Post

Mastering Load Balancing for Optimal WordPress Performance: A Comprehensive Guide

Mastering Load Balancing for Optimal WordPress…

Enhance your WordPress site's performance and reliability…

Understanding Web Application Firewall (WAF)

Understanding Web Application Firewall (WAF)

Explore Web Application Firewalls (WAFs): how they…

Deploy a WordPress website on AWS

How to deploy a WordPress website on AWS?

Launching your WordPress website on Amazon Web Services unlocks unparalleled scalability, security, and performance. Skilled developers are able to harness AWS’s robust infrastructure to ensure seamless uptime, rapid content delivery, and comprehensive management to deliver a superior digital experience effortlessly.

This guide makes it easy for beginners to follow step-by-step, even if you don’t have any coding experience. So, let’s get started! 

Step 1: Sign Up for AWS and Set Up Your Account

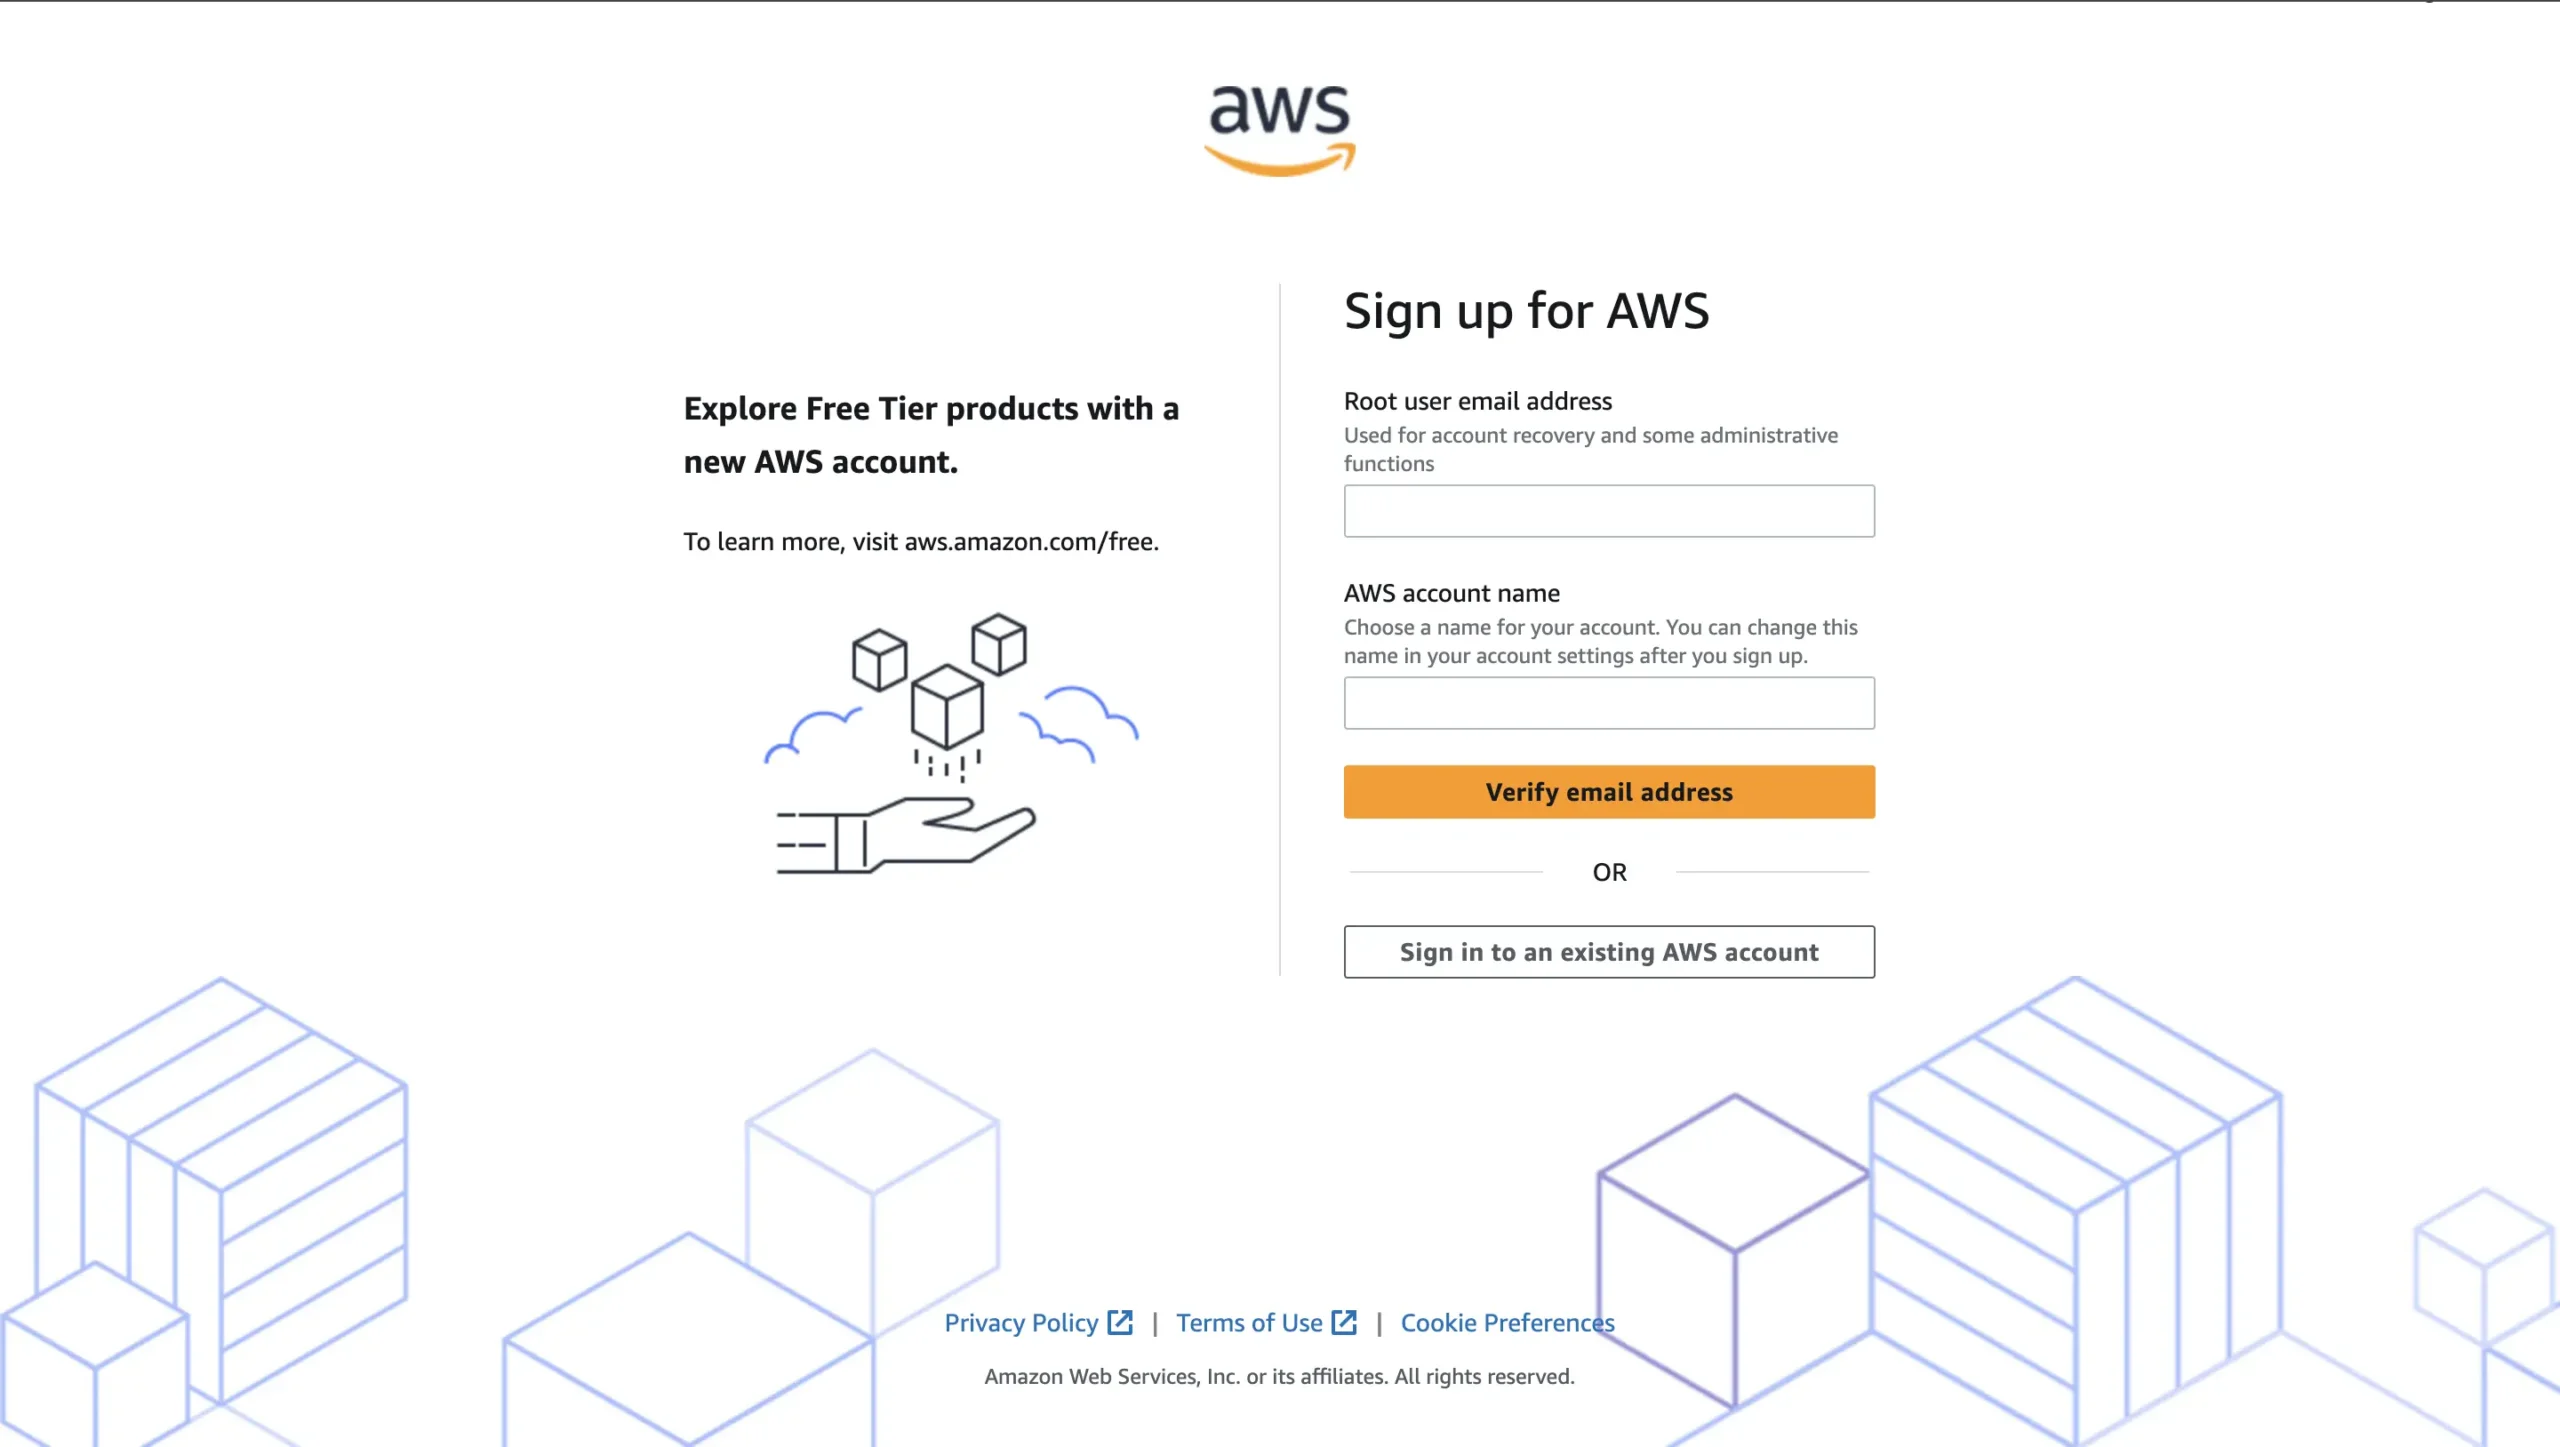
  • Go to the AWS homepage and click “Create an AWS account.”

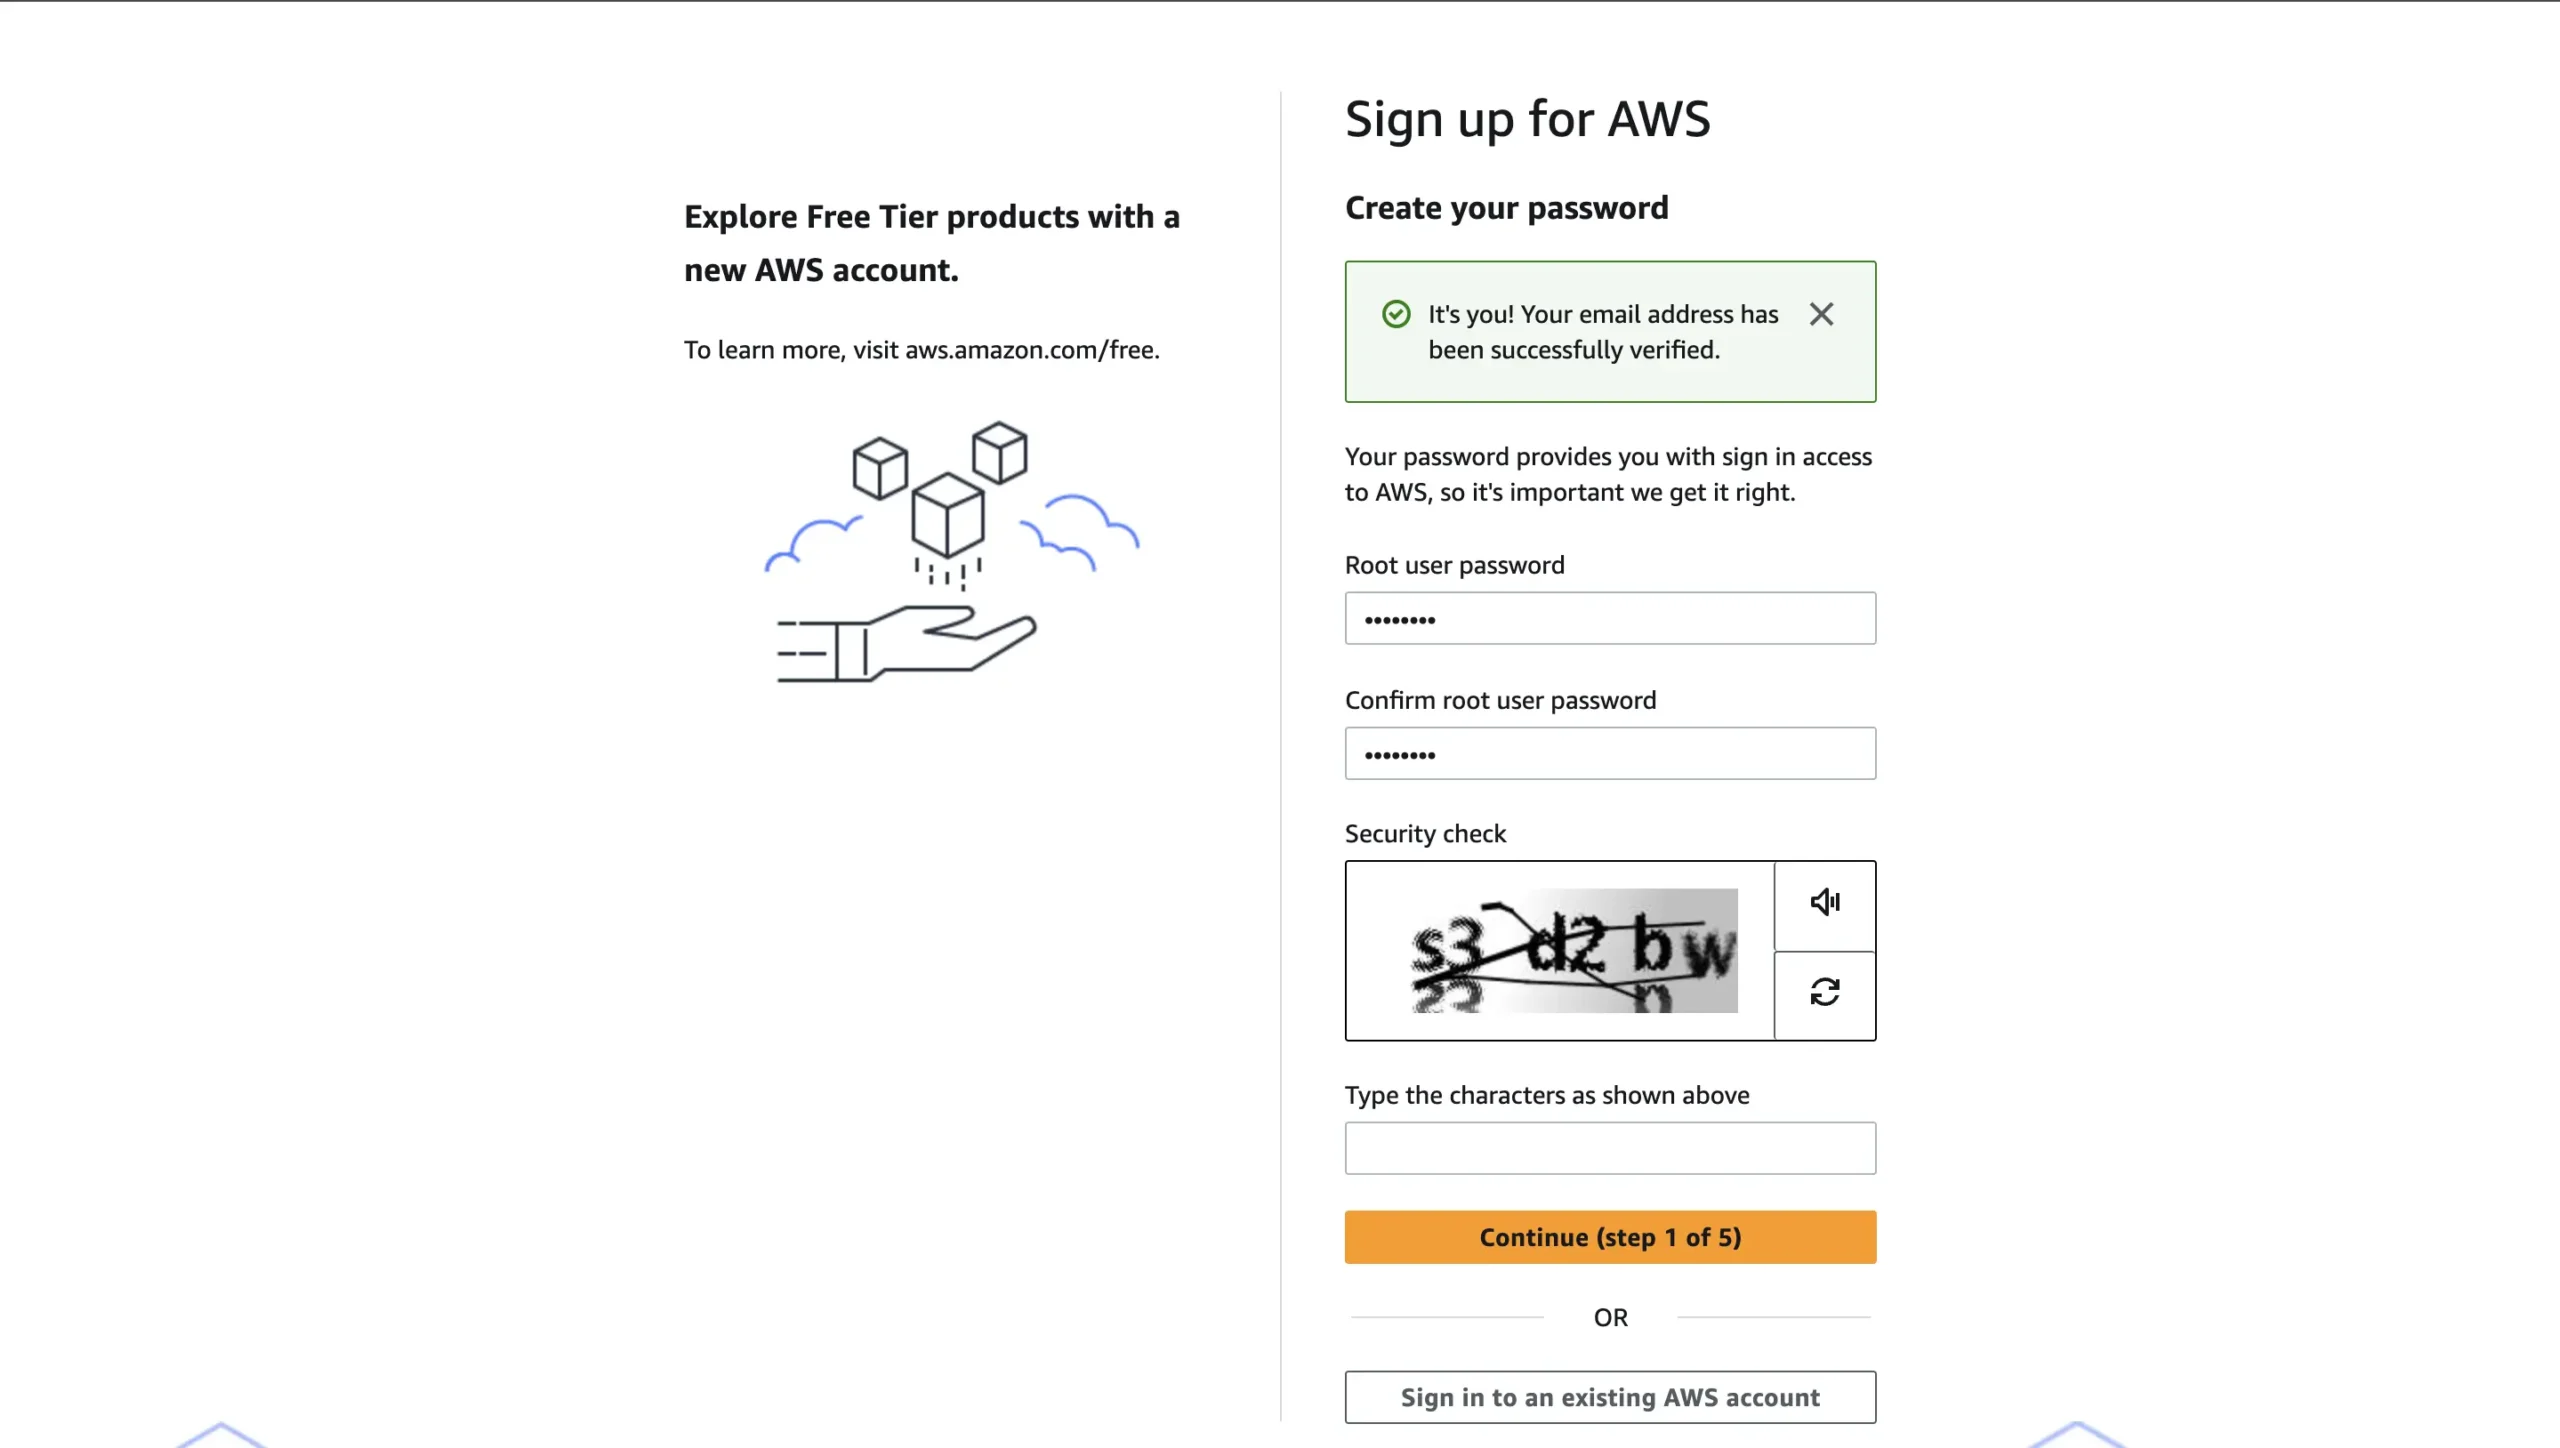
  • Fill in your email, set a password, and choose an account name.

  • You’ll need to provide contact information and verify your identity with a mobile phone.
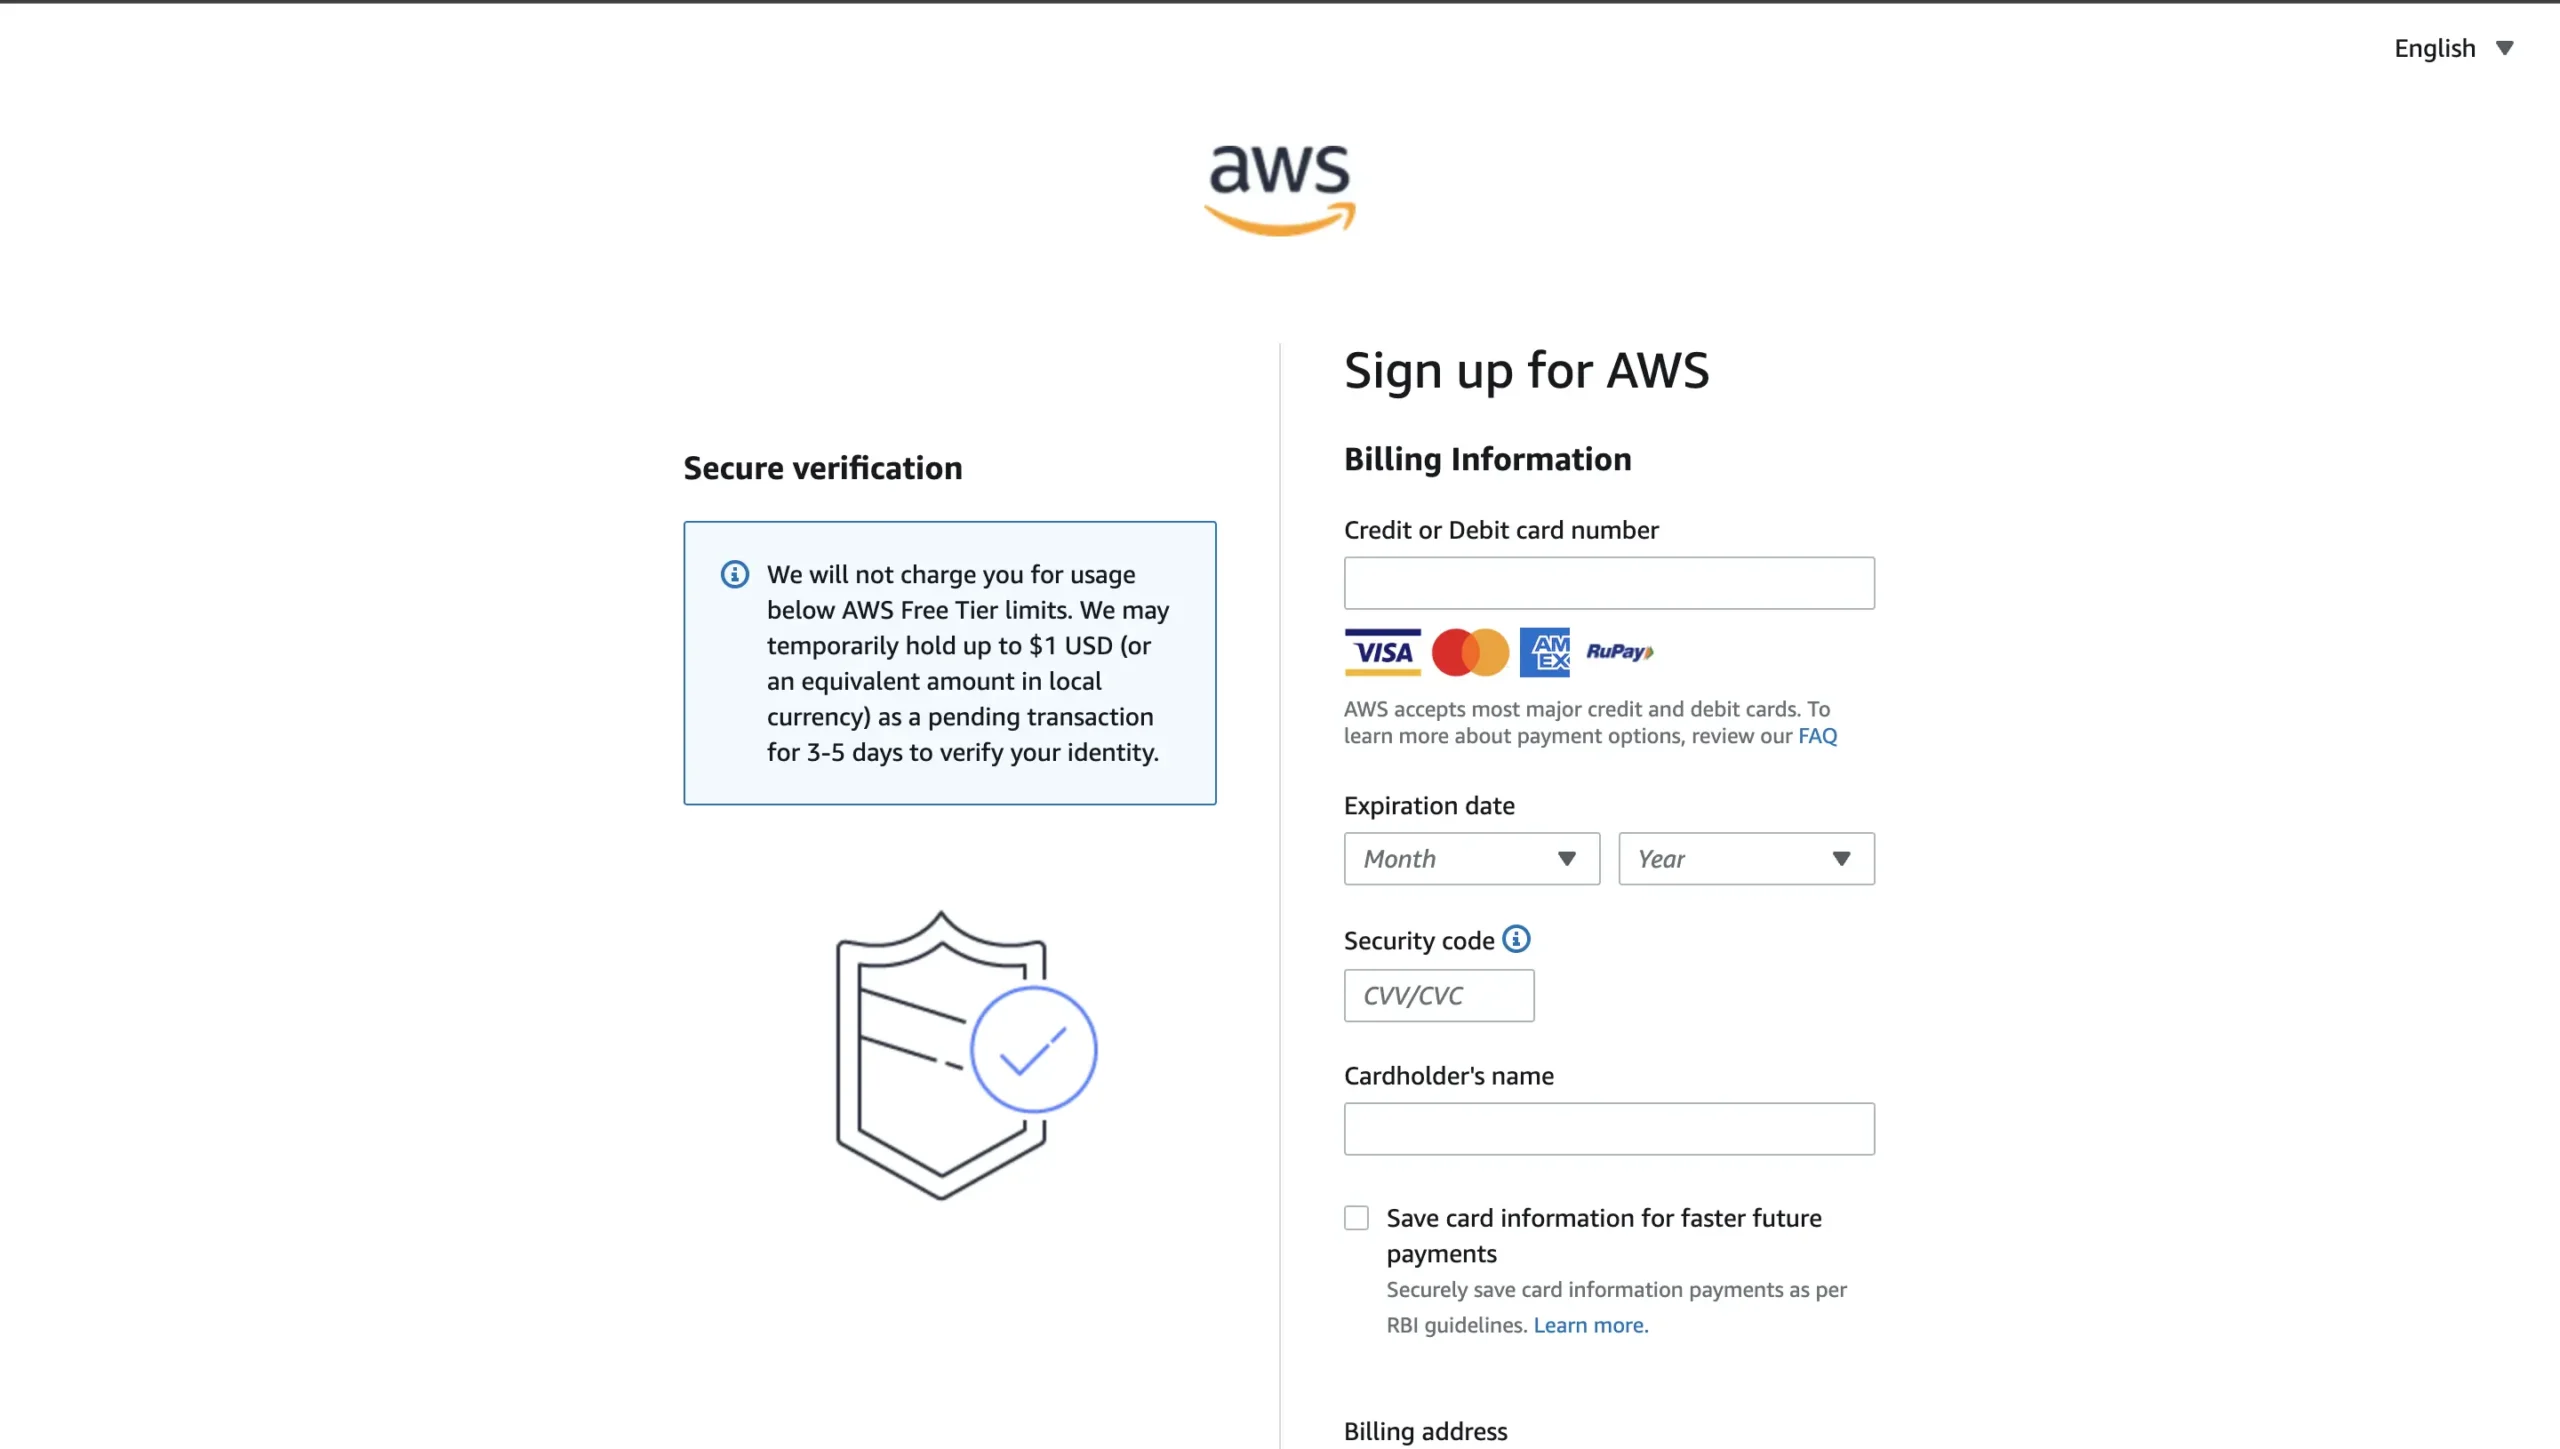
  • After entering your credit card details for identity verification purposes (your card won’t be charged if you stay within the Free Tier limits), choose the “Basic” support plan, which is free.

Step 2: Generate an AWS Access Key

Once registered, you need an AWS Access Key and Secret for secure interaction with AWS services:

  • Log into the AWS Management Console.
  • Navigate to your account details section.

  • Select “Security Credentials” and create a new access key. Download and save this key securely, as you will need it to operate AWS services.

Step 3: Deploy WordPress Using Bitnami

Bitnami offers a simplified way to deploy WordPress on AWS:

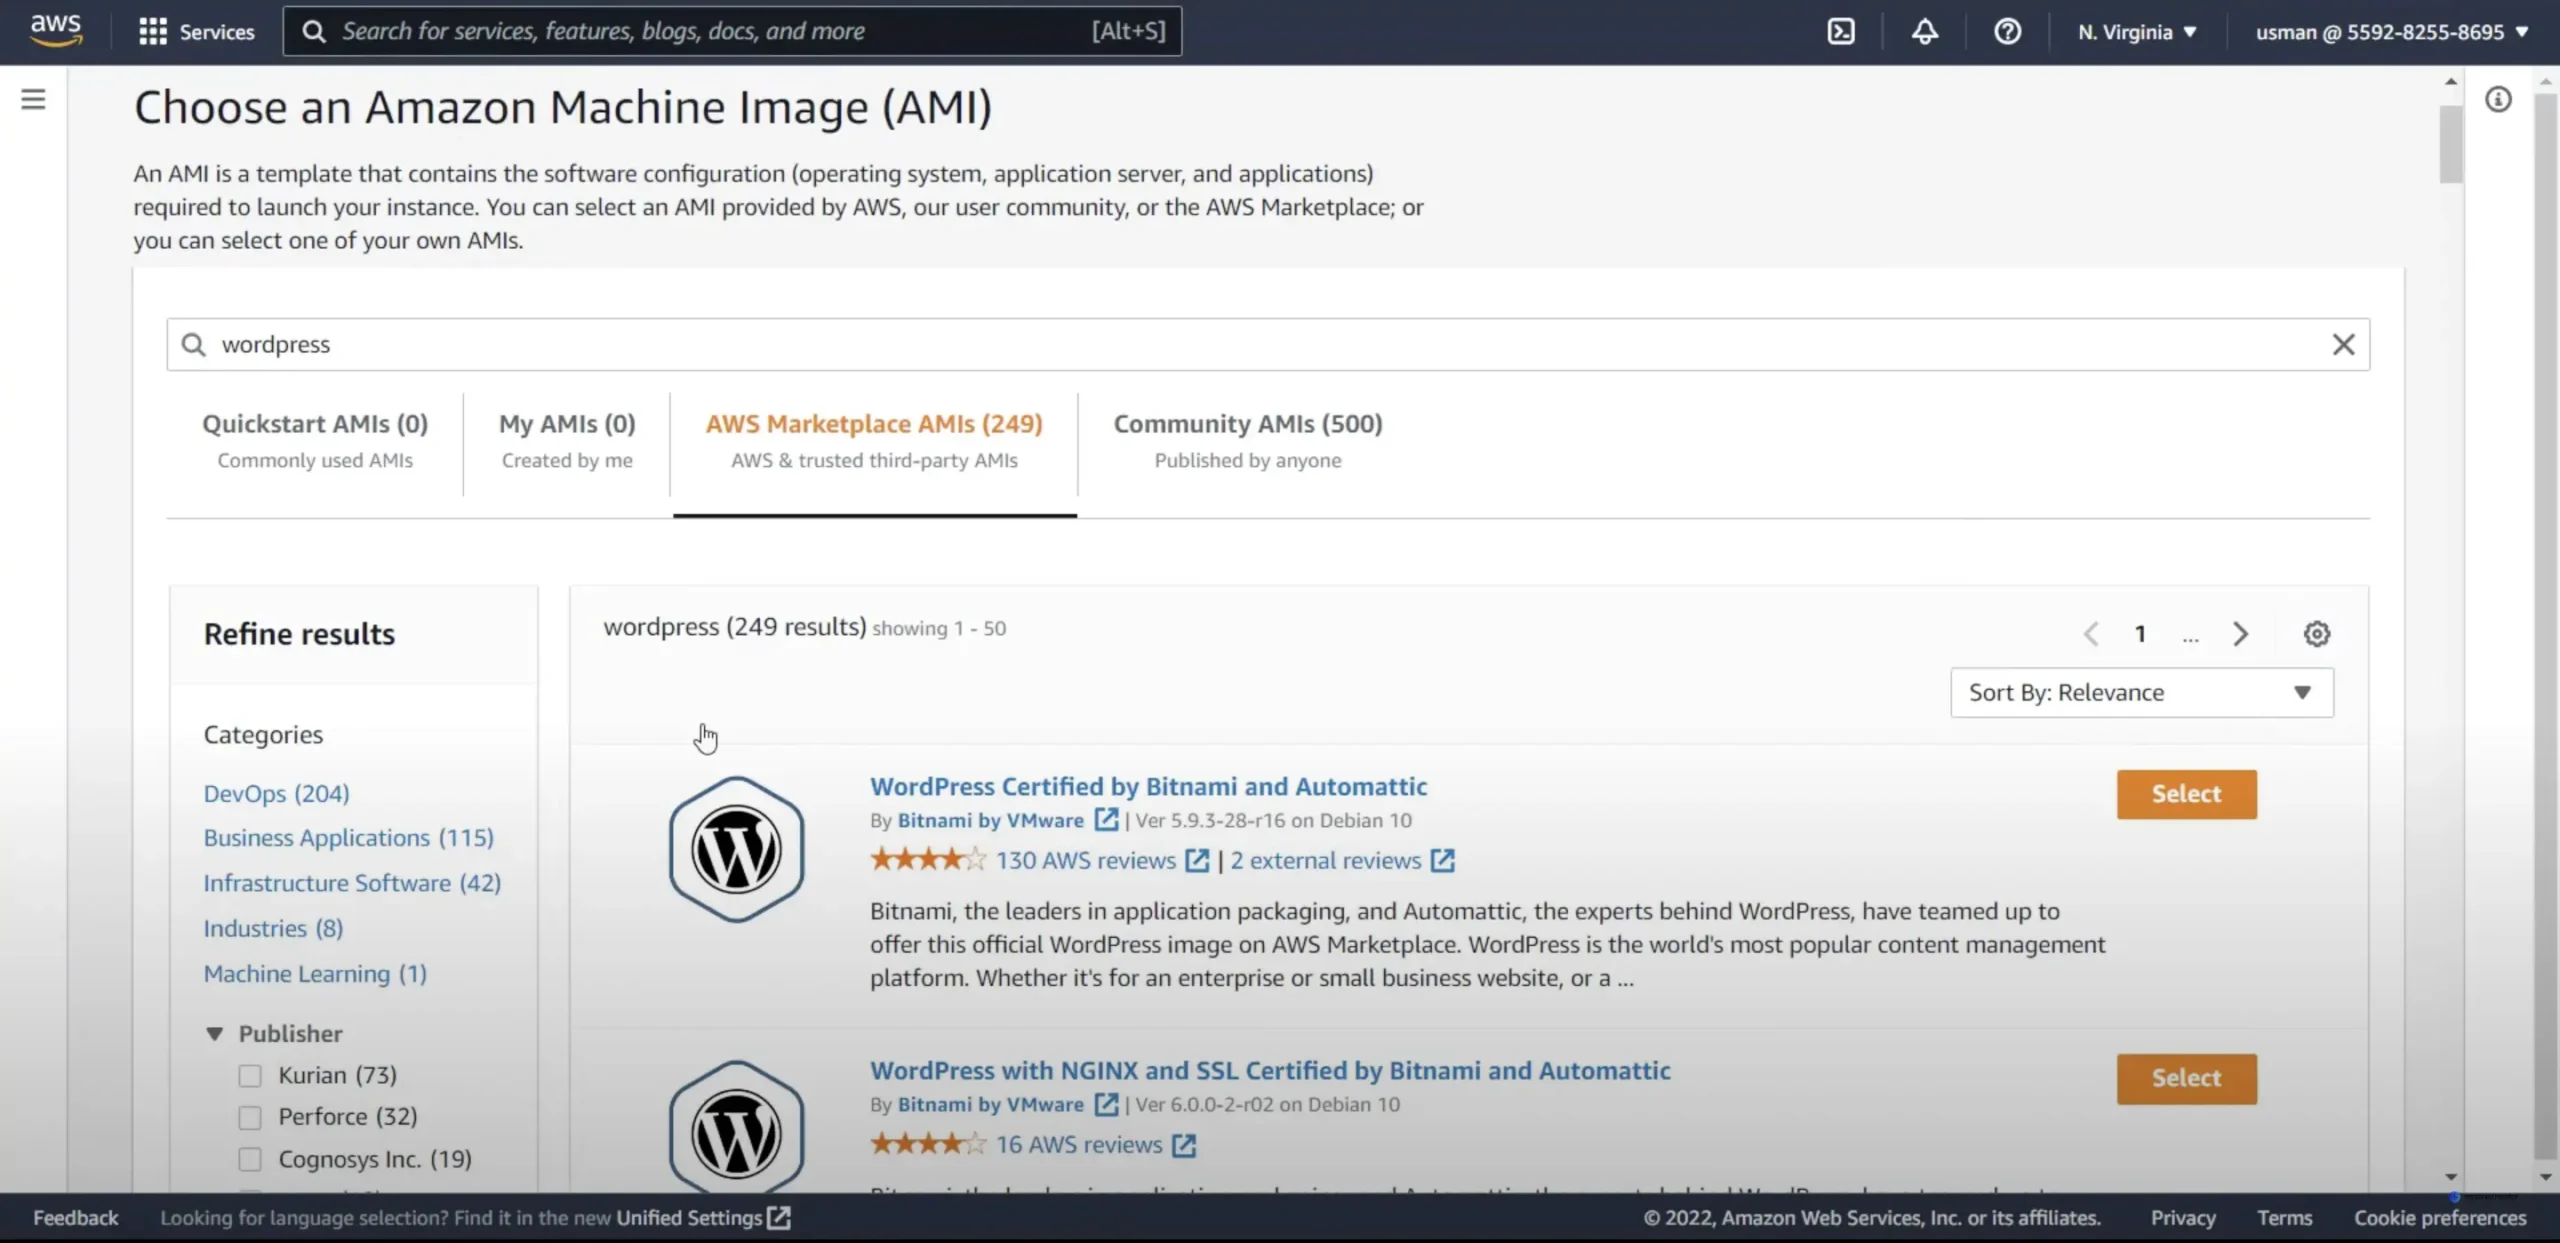
  • Log into the AWS Marketplace.
  • Search for “Bitnami WordPress Stack” and select it from the results.

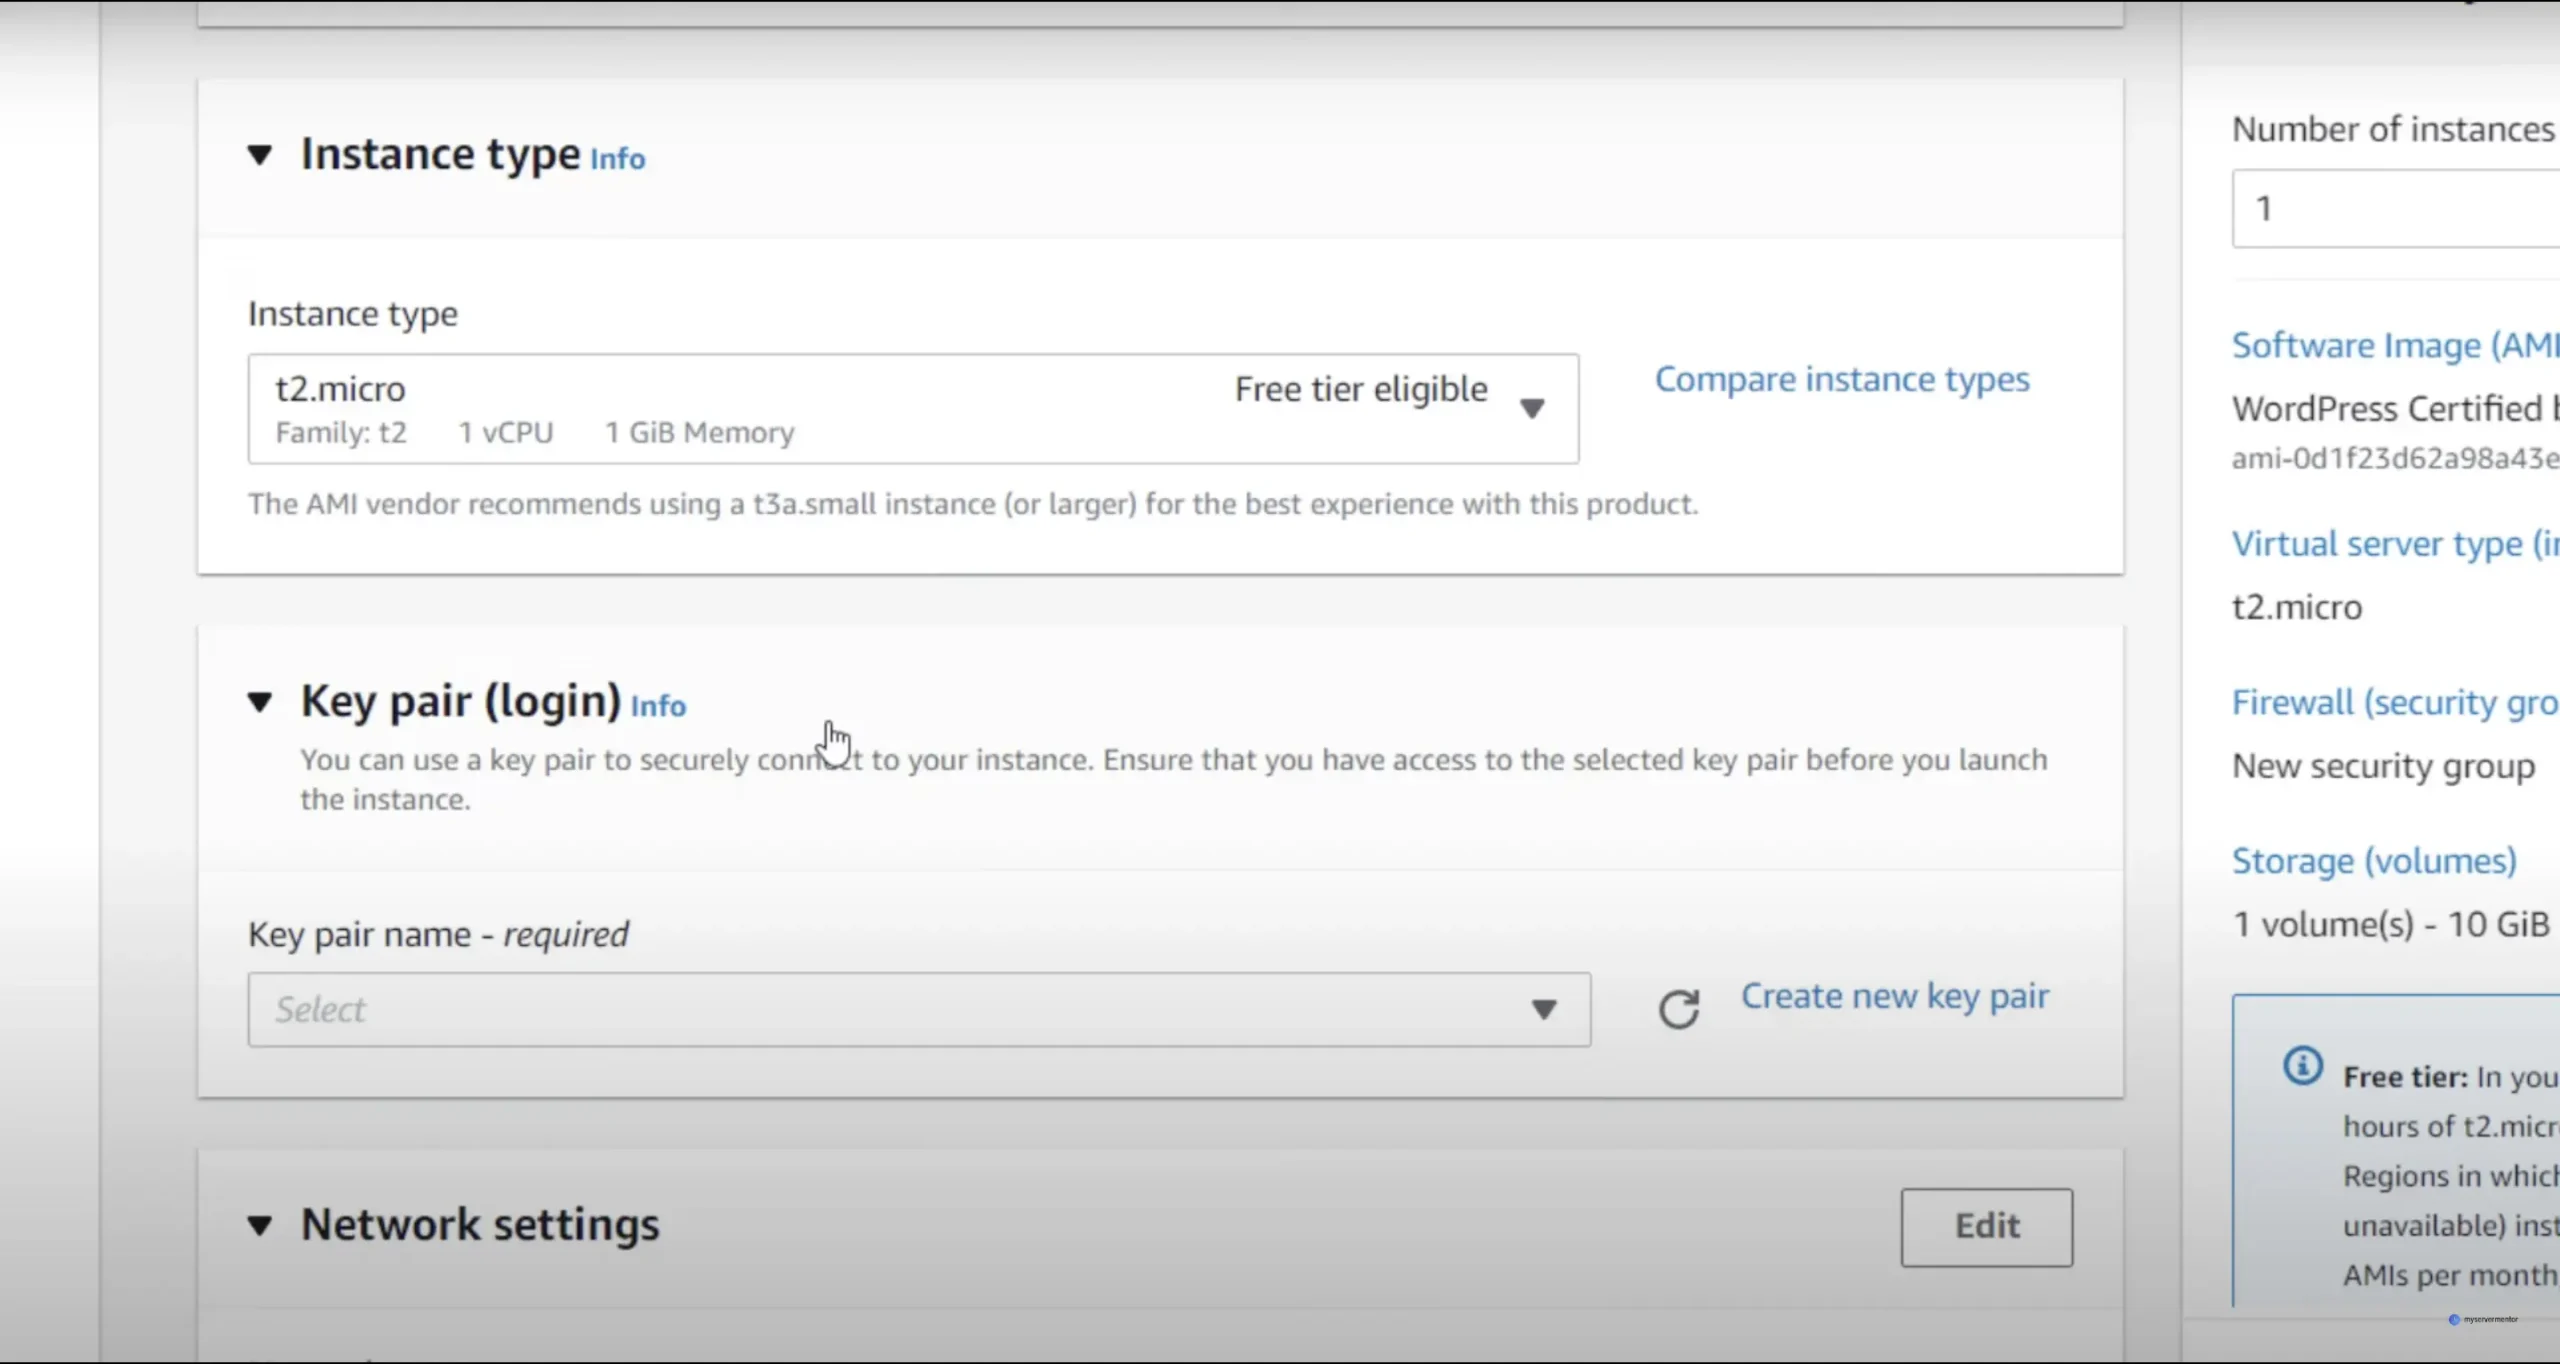
  • Click “Continue” to proceed with the 1-Click Launch options. Here, you can choose your instance type (e.g., micro for lower traffic sites), and verify the Key Pair you generated earlier.

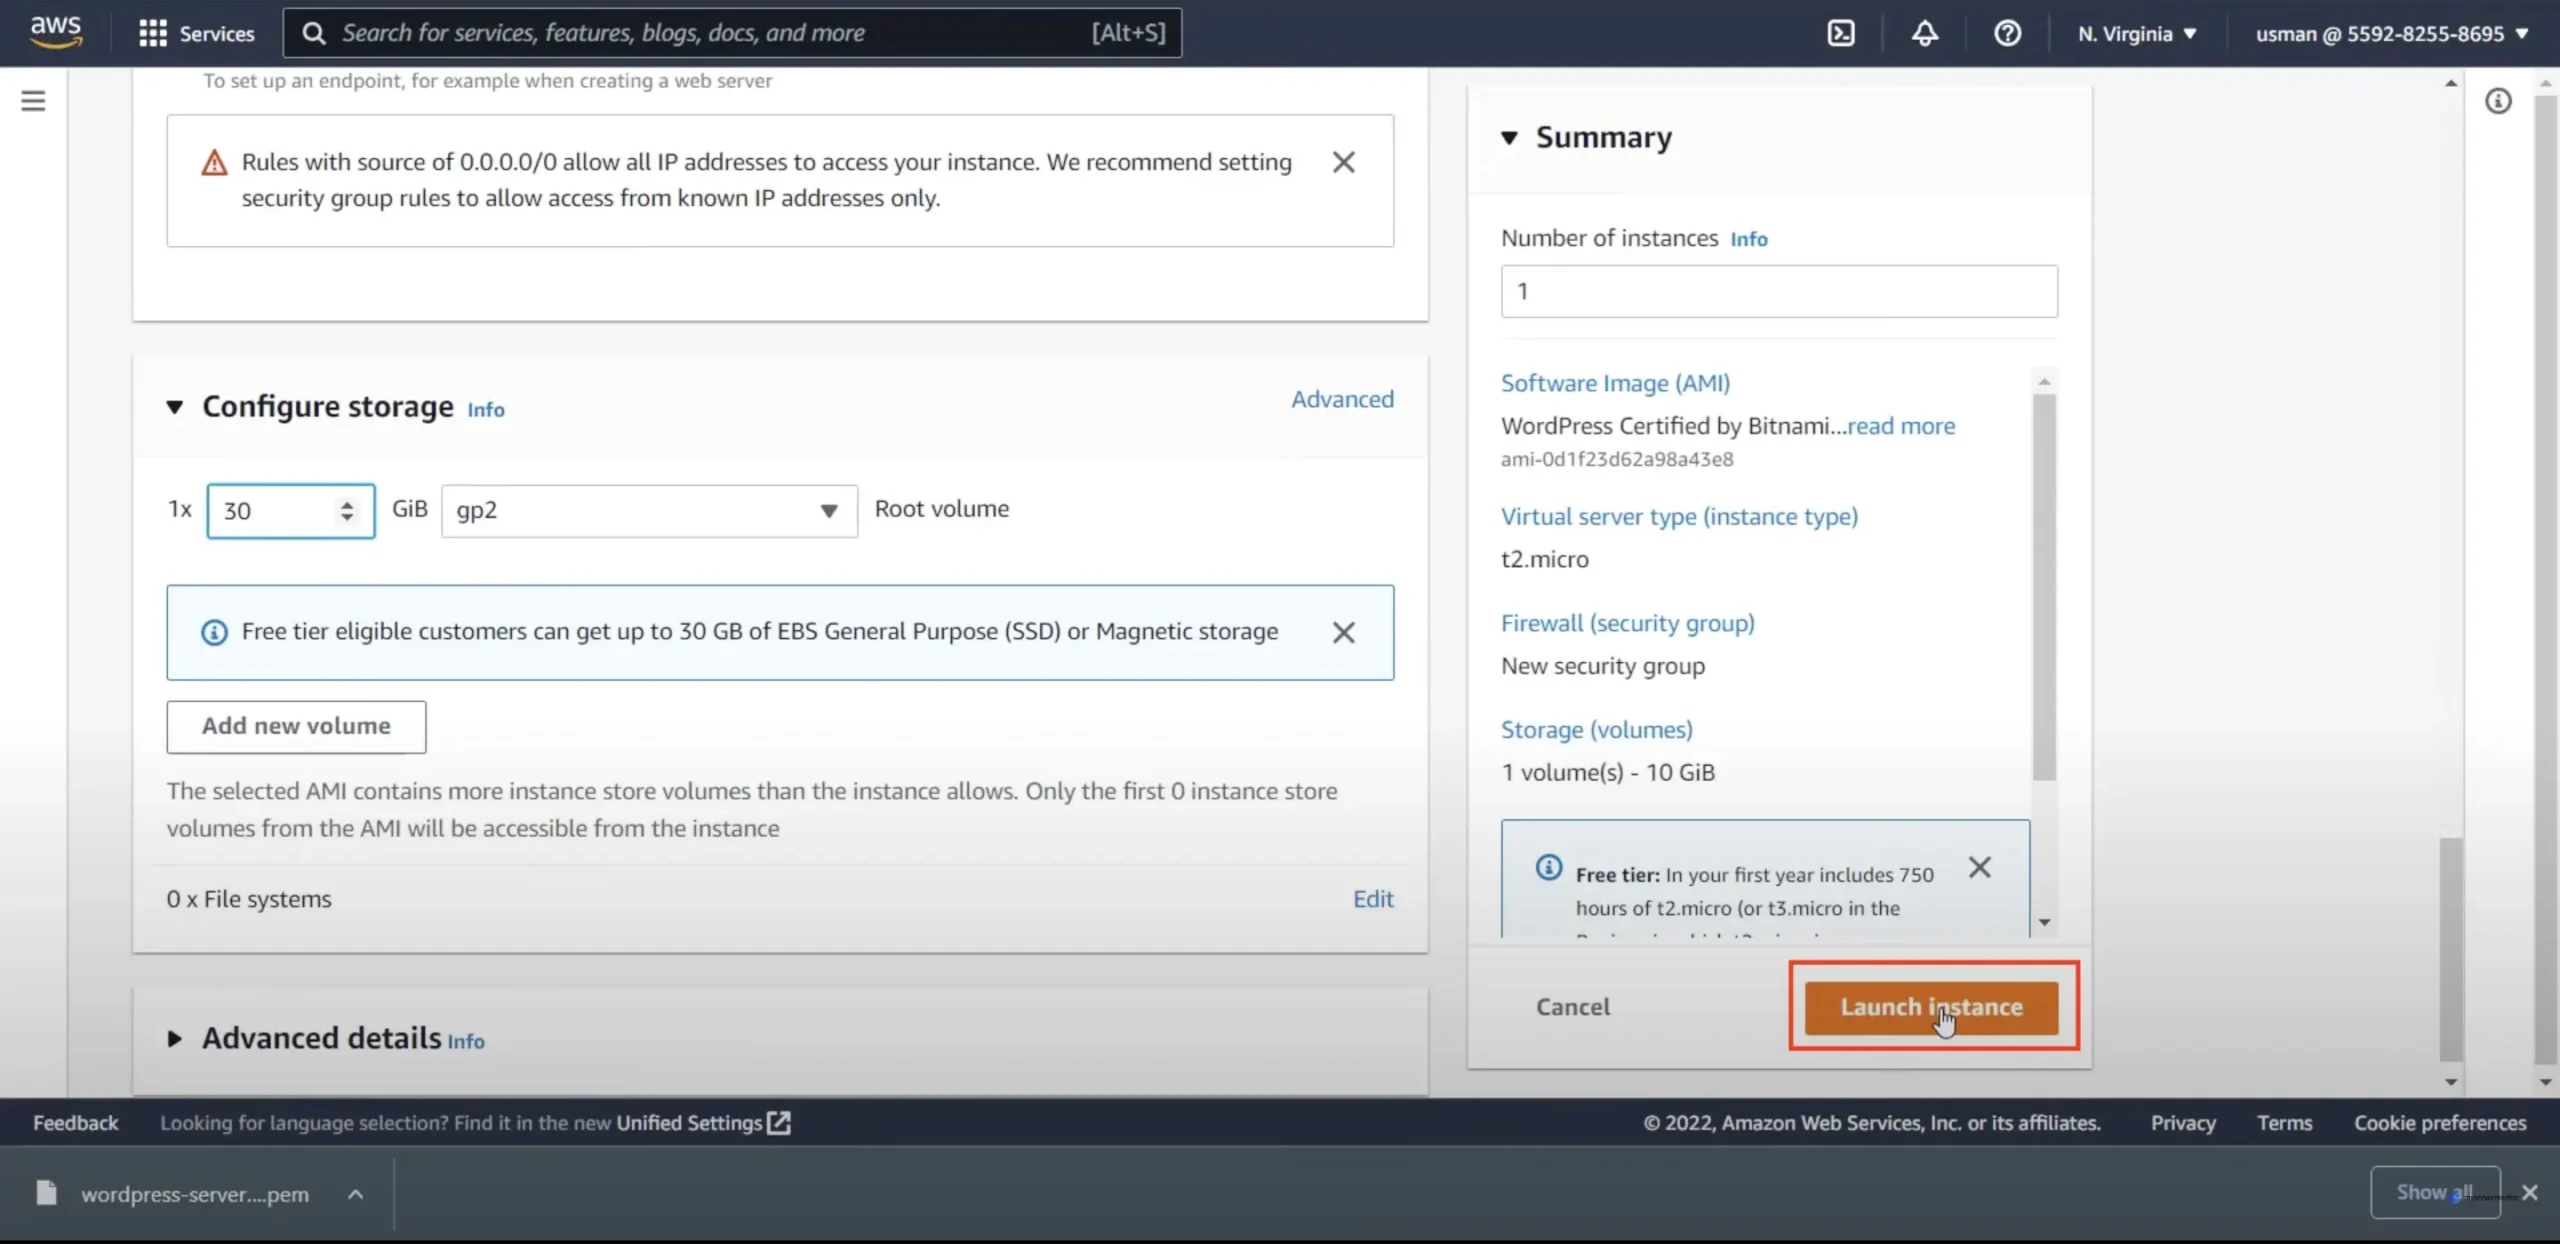
  • Click “Launch with 1-Click.” AWS will now initialize your WordPress installation.

Step 4: Obtain WordPress Credentials

Once your instance is running, you’ll need the administrator credentials to access your new WordPress site:

  • Go back to the AWS Console.
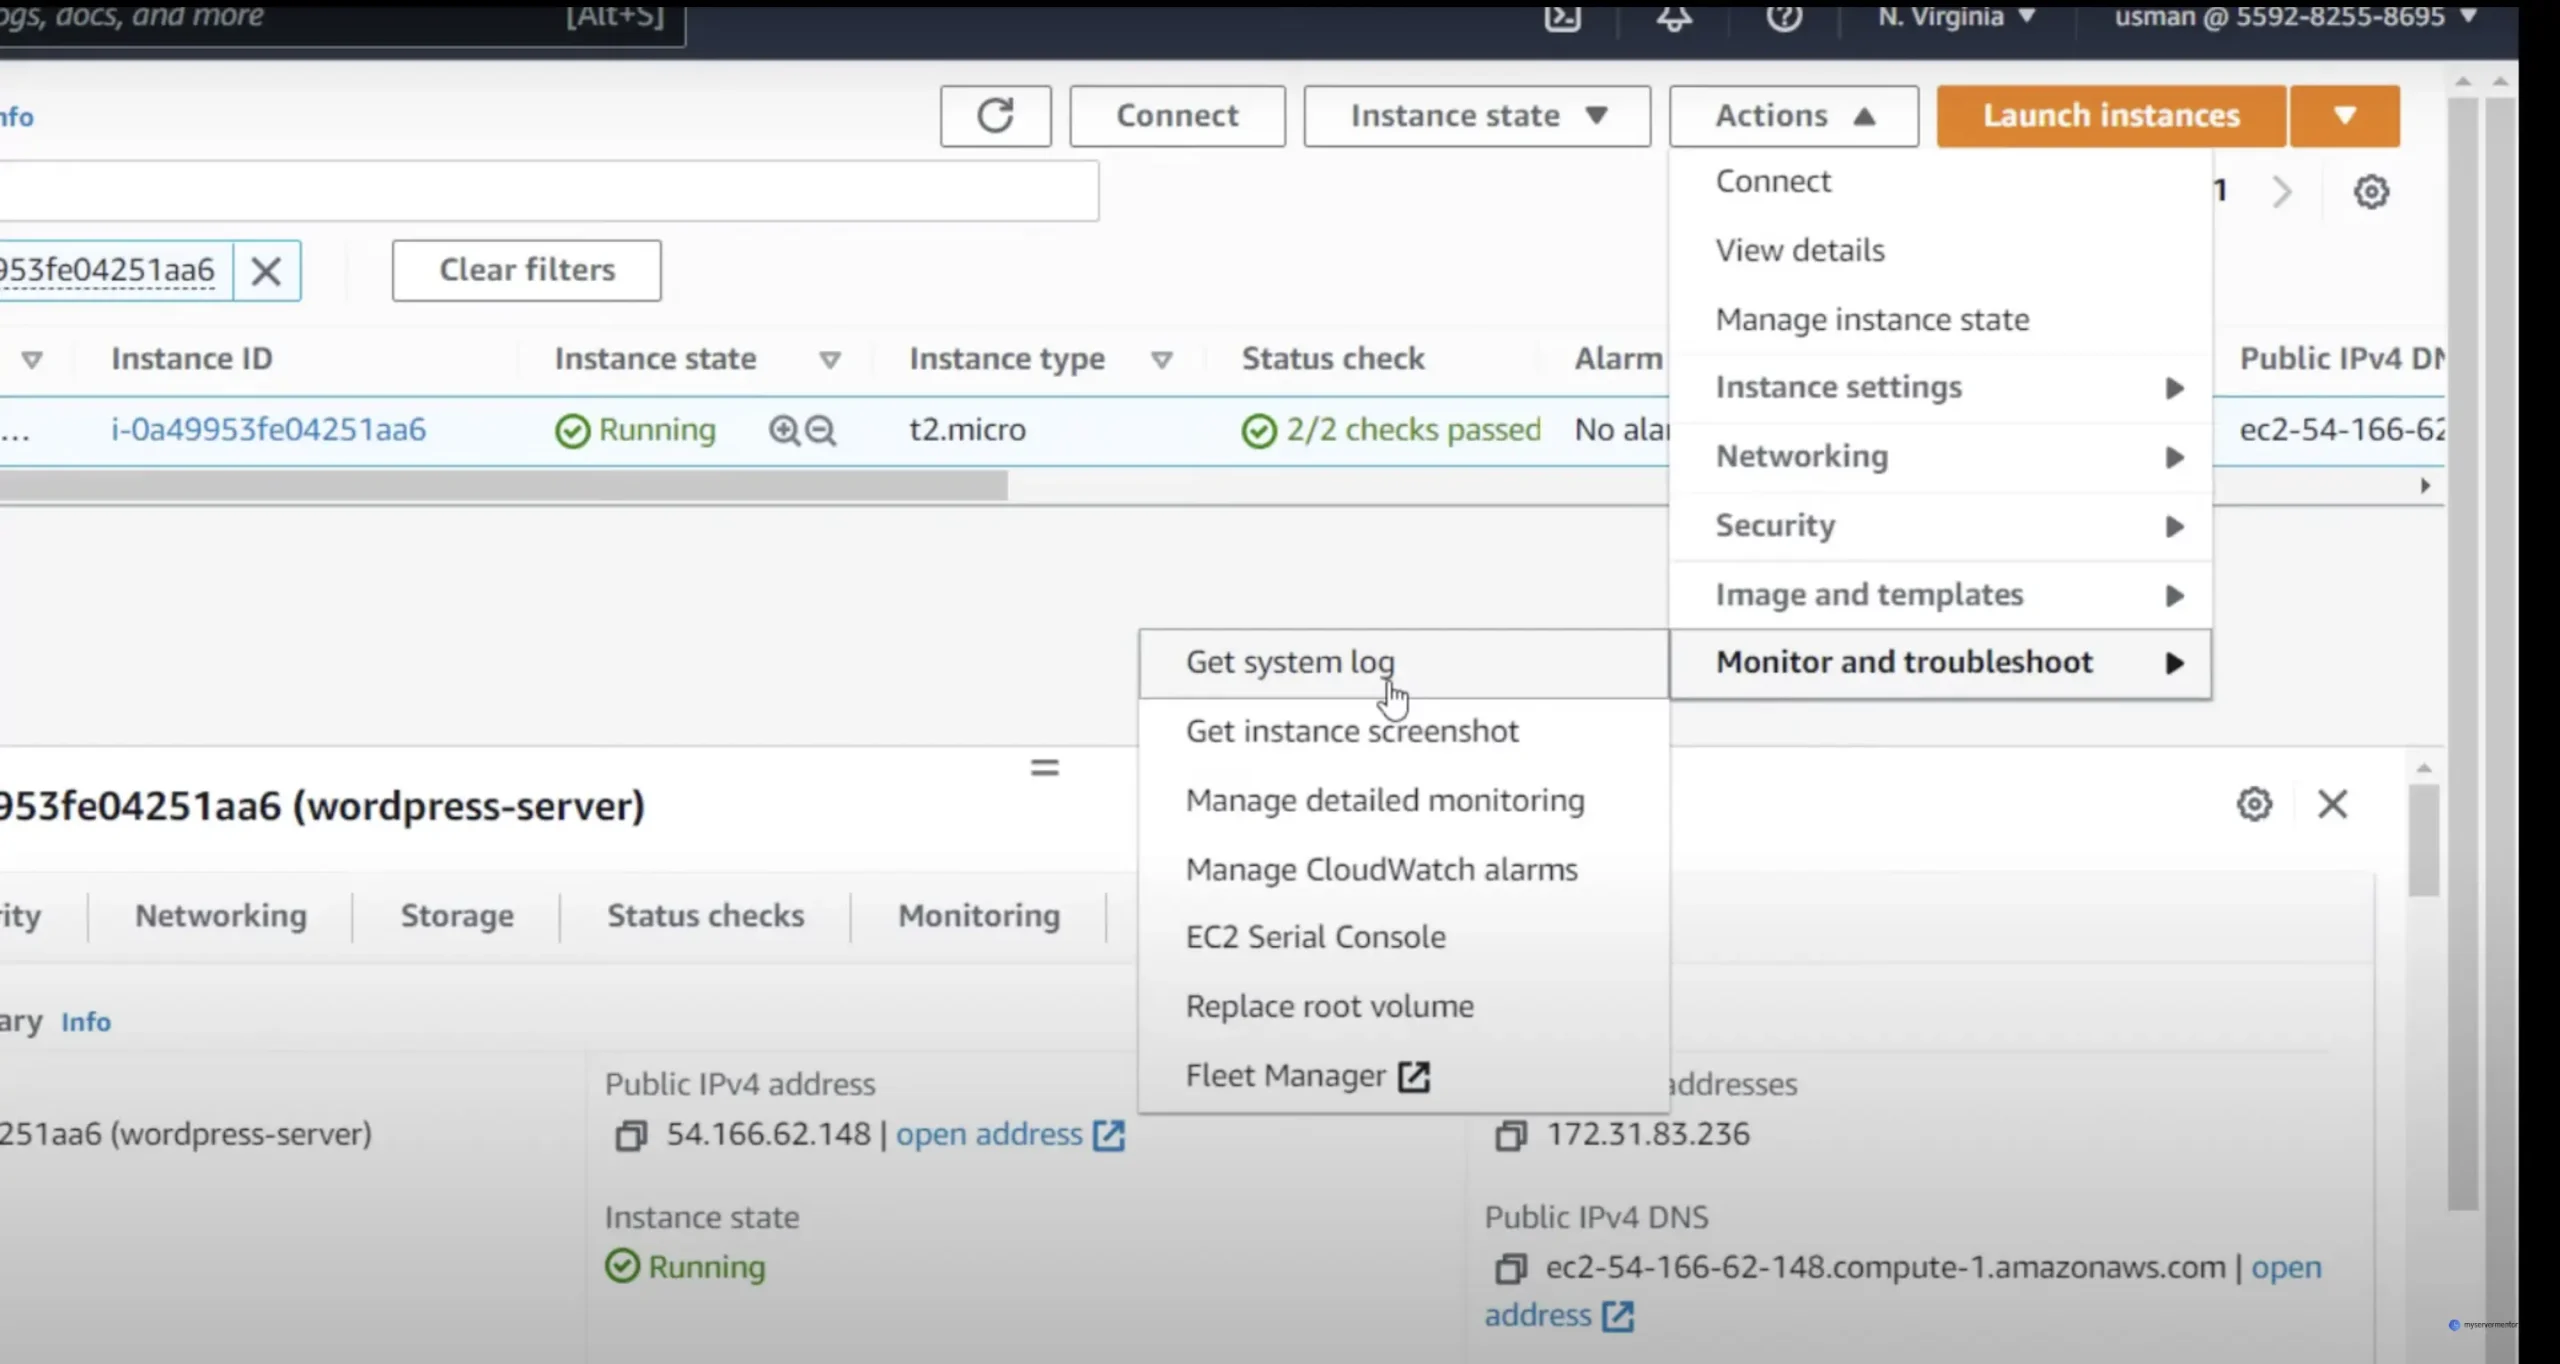
  • Navigate to the EC2 dashboard and select your instance.
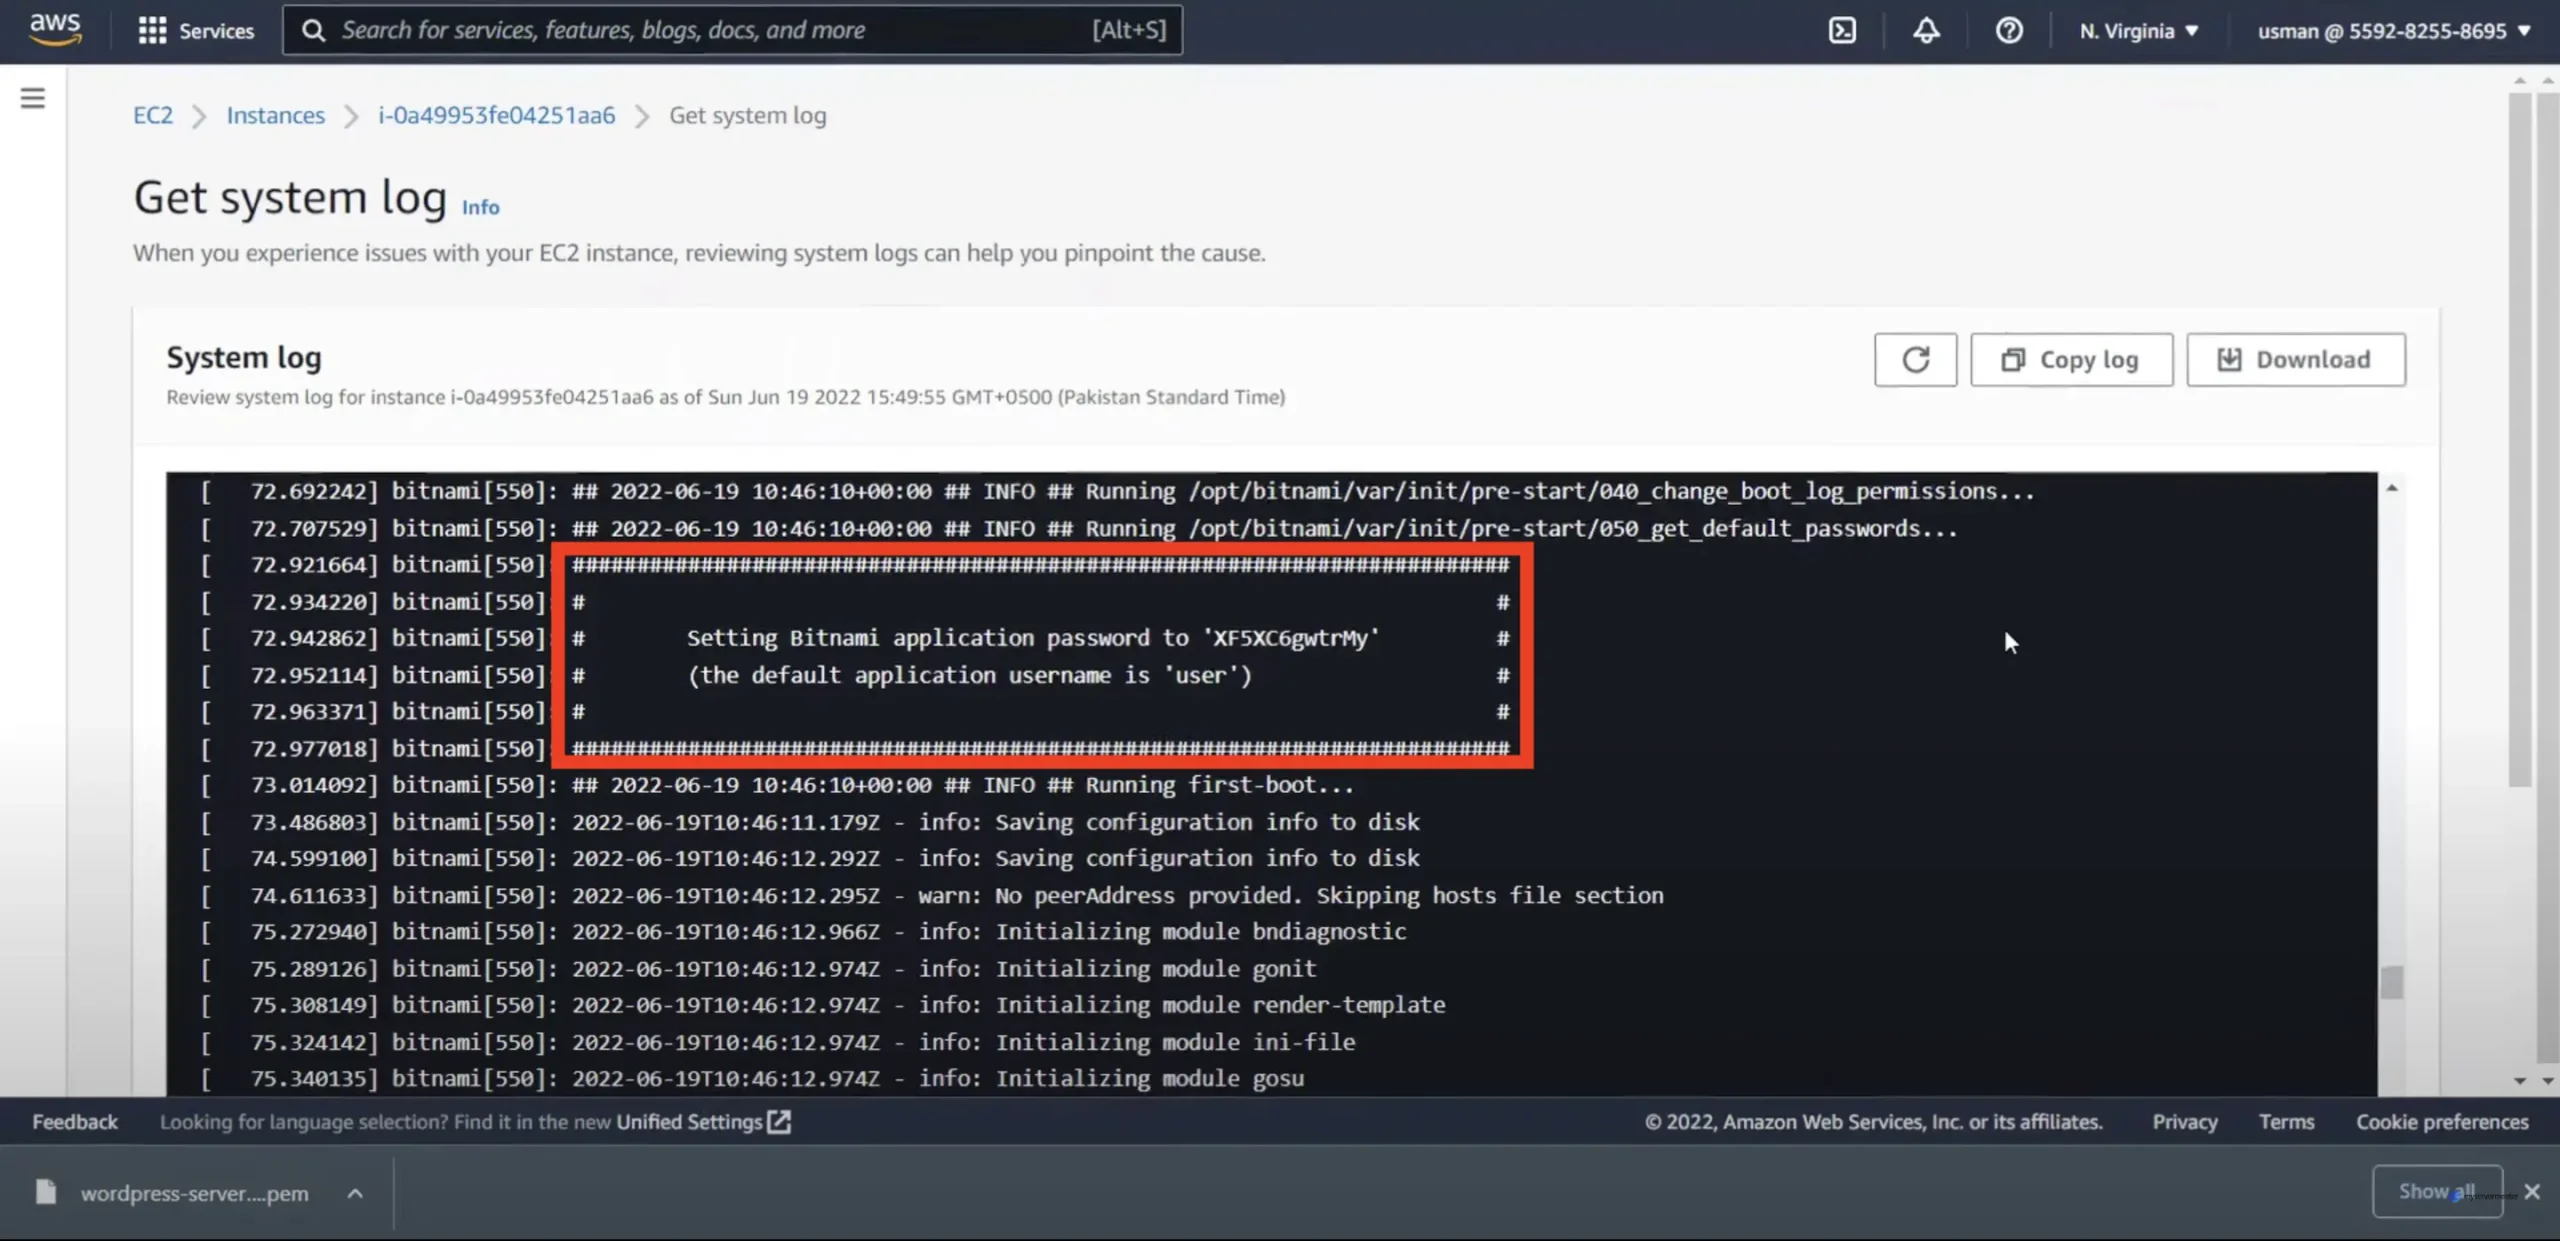
  • Under “Actions,” select “Get System Log.”

  • Scroll through the log to find your WordPress ‘Admin’ username and password. Save these credentials securely.

Step 5: Log Into Your WordPress Site

With your credentials:

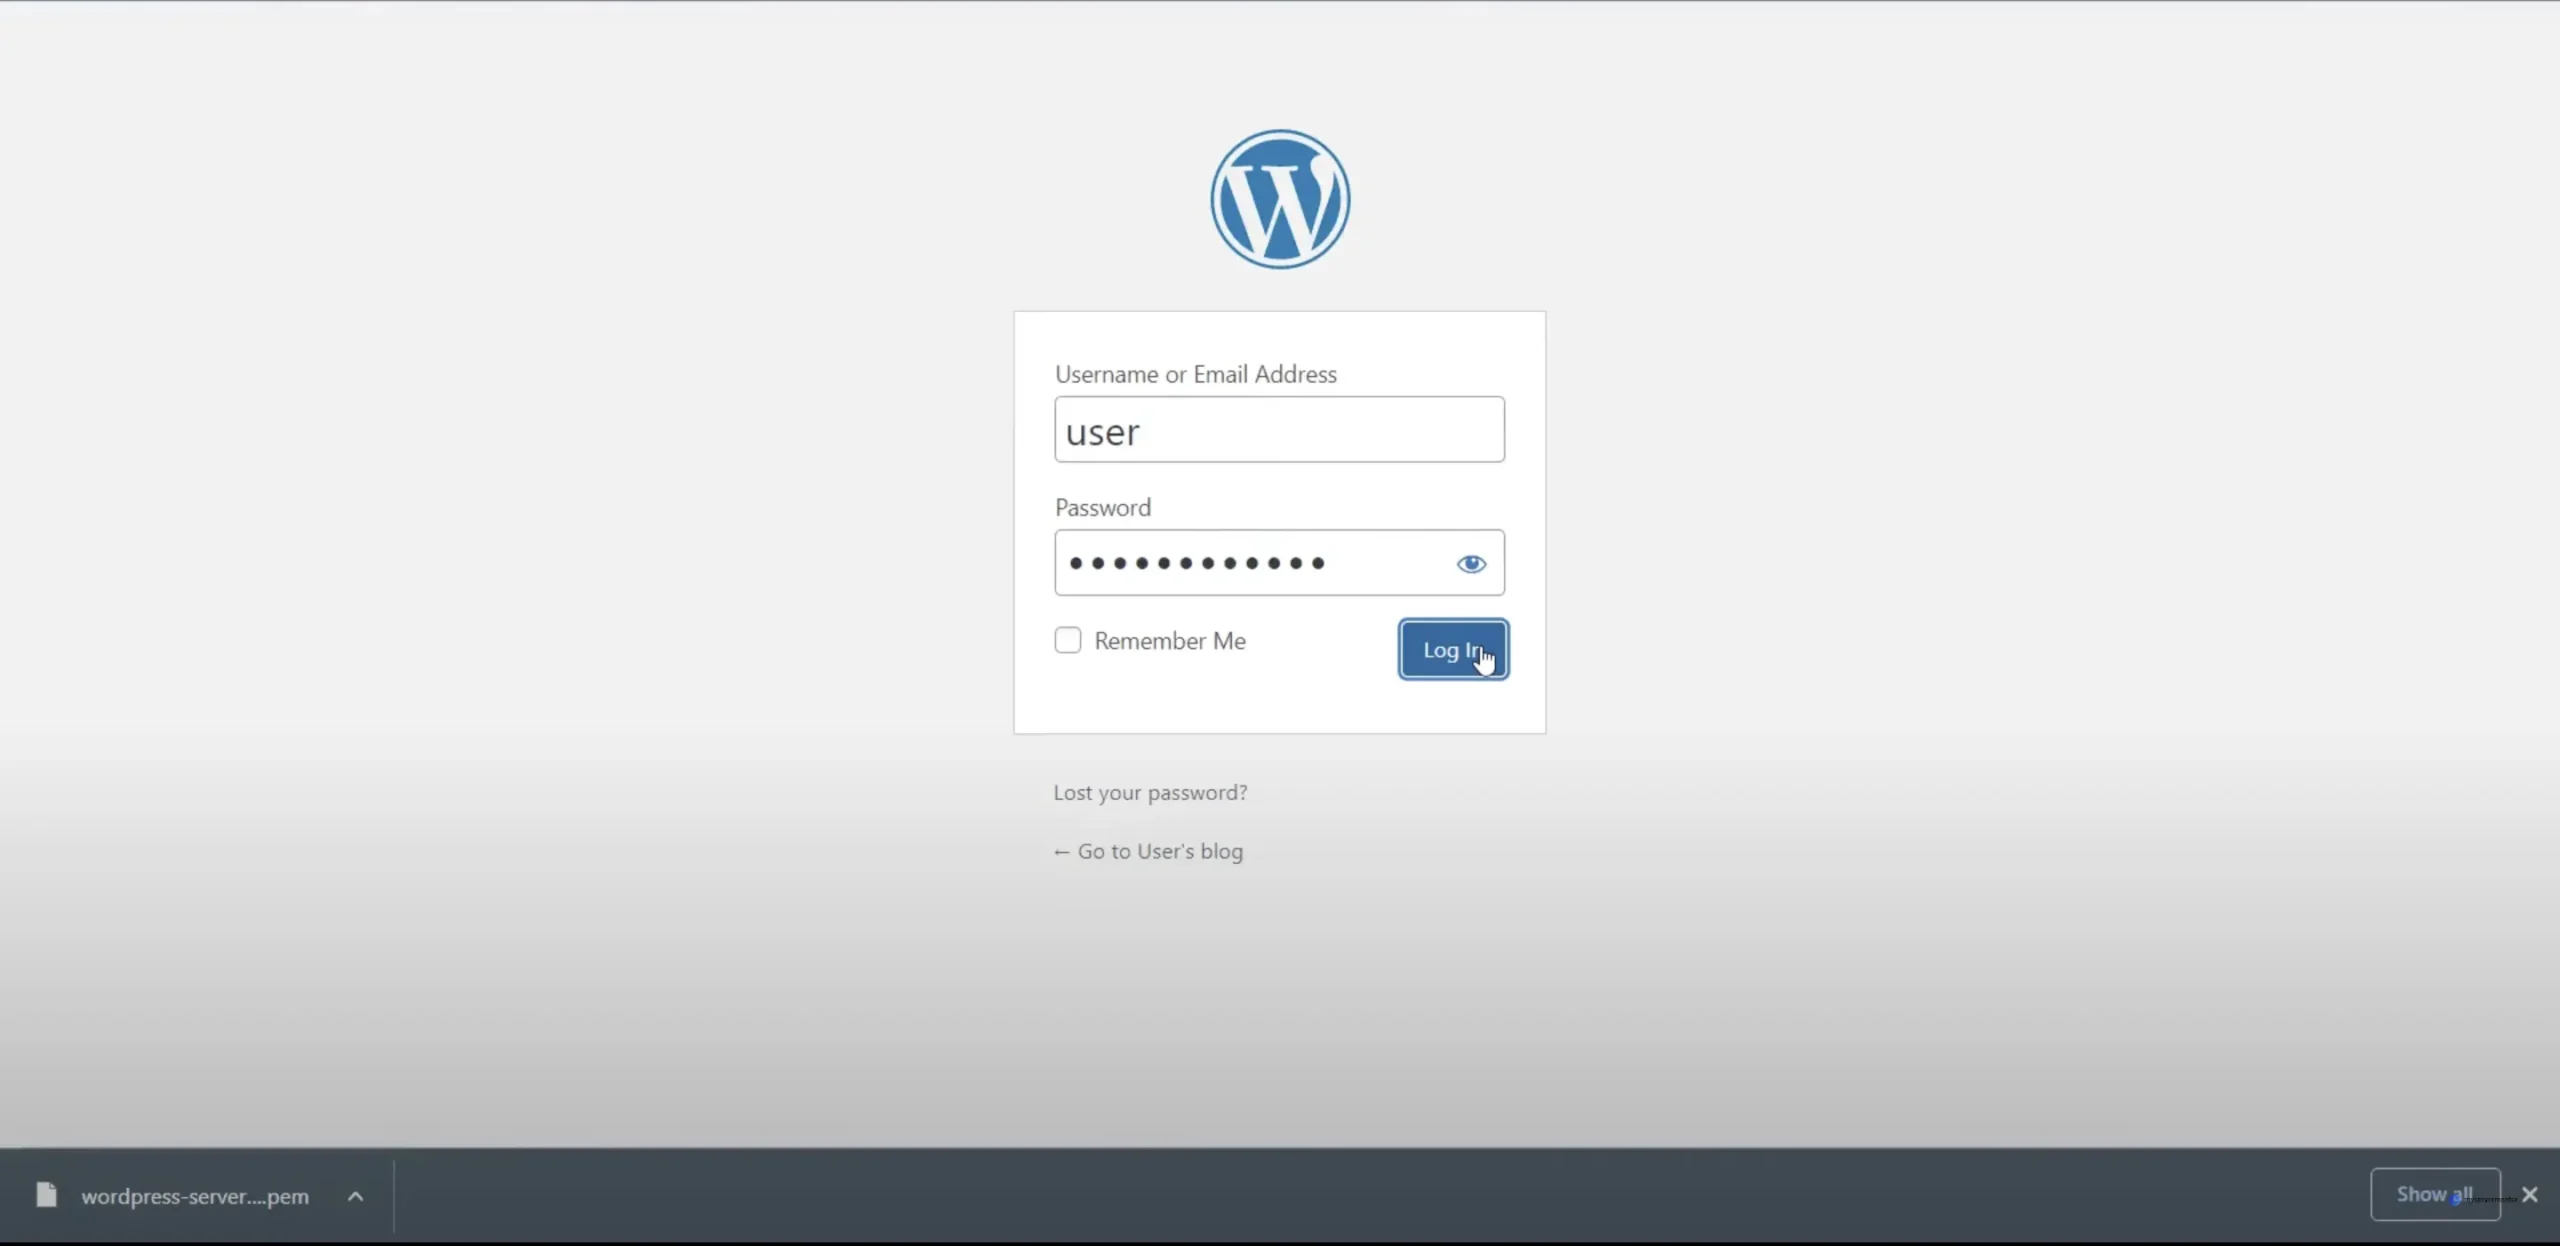
  • Open a web browser and enter your instance’s public IP address followed by /wp-admin (e.g., http://<your-public-ip>/wp-admin).
  • Log in using the credentials obtained from the system log.

Step 6: Regular Maintenance and Backup

Regularly check for WordPress updates to ensure your site remains secure and functional:

  • Navigate to “Dashboard → Updates.”
  • If updates are available, click “Update Now” to install the latest version

Conclusion

Setting up a WordPress site on Amazon Web Services (AWS) is easy and stress-free. You get to take advantage of AWS’s awesome features, which means your site will stay fast and reliable even as it grows bigger. Plus, with AWS on your side, your WordPress site will have top-notch security and be available to users all the time.

Have fun setting up your WordPress site on AWS and enjoy the perks it brings to your online presence!

Recent Post

Mastering Load Balancing for Optimal WordPress Performance: A Comprehensive Guide

Mastering Load Balancing for Optimal WordPress…

Enhance your WordPress site's performance and reliability…

Understanding Web Application Firewall (WAF)

Understanding Web Application Firewall (WAF)

Explore Web Application Firewalls (WAFs): how they…